Category: Technology

How to Configure Okta as an External Identity Provider for PlainID SSO: A Complete Beginner’s Guide

In this guide, you’ll learn how to integrate Okta as an external identity provider (IdP) for PlainID, enabling seamless Single Sign-On (SSO) for your applications via OIDC (OpenID Connect). We’ll start from scratch, including creating an Okta developer account, setting up apps, configuring PlainID tenant settings, resolving common errors, and managing users, with detailed steps and explanations. 

Prerequisites

Before we start, ensure you have: 

  • A valid PlainID tenant (e.g., <company>.us1.plainid.io) 
  • A PlainID admin account  
  • Basic familiarity with SSO/IdP concepts helps, but is not required, this guide explains it all. 
Step 1: Create an Okta Developer Account

Visit https://developer.okta.com/signup/ to create an account. 

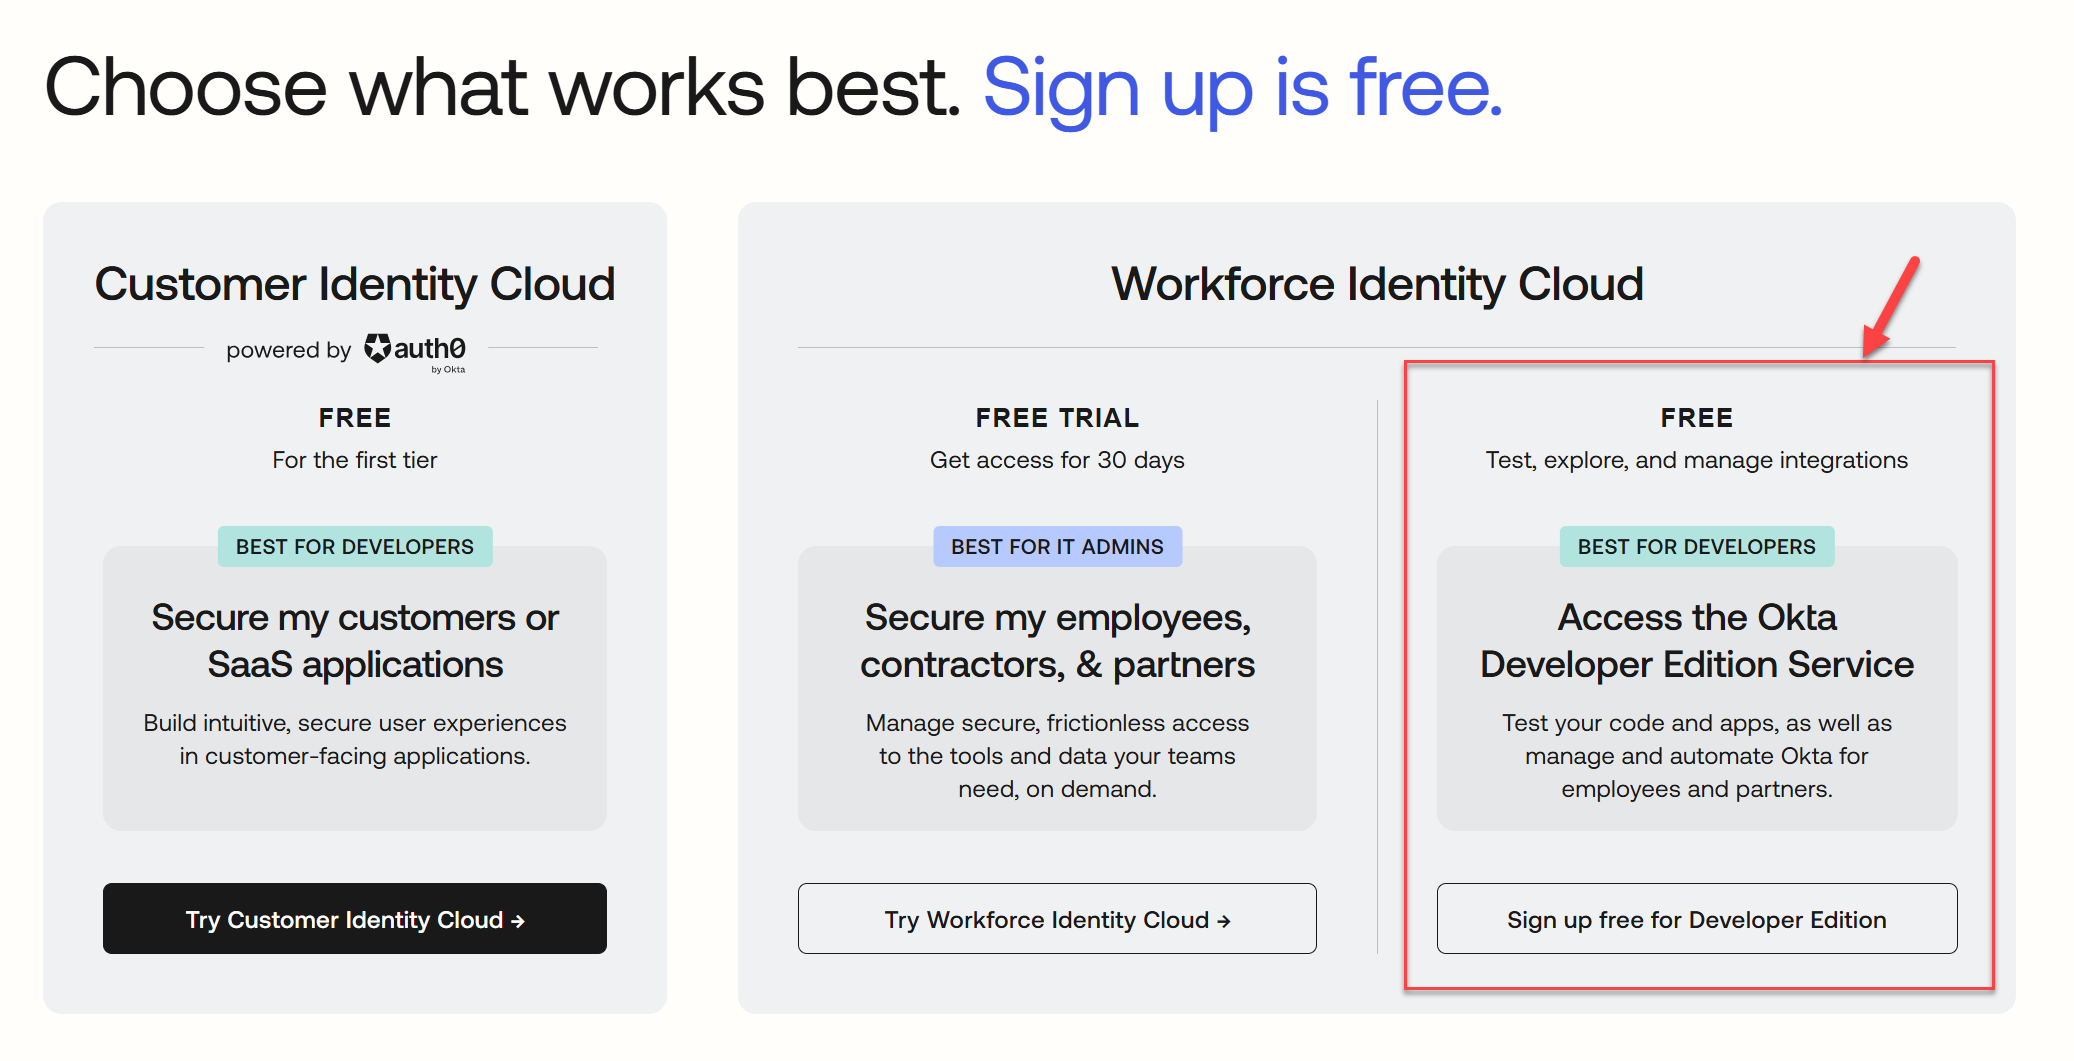
You’ll be presented with three account types: 

Choose the Developer Account. This version is free and allows us to test OIDC integrations like we’ll do with PlainID. 

Step 2: Create a Web Application in Okta
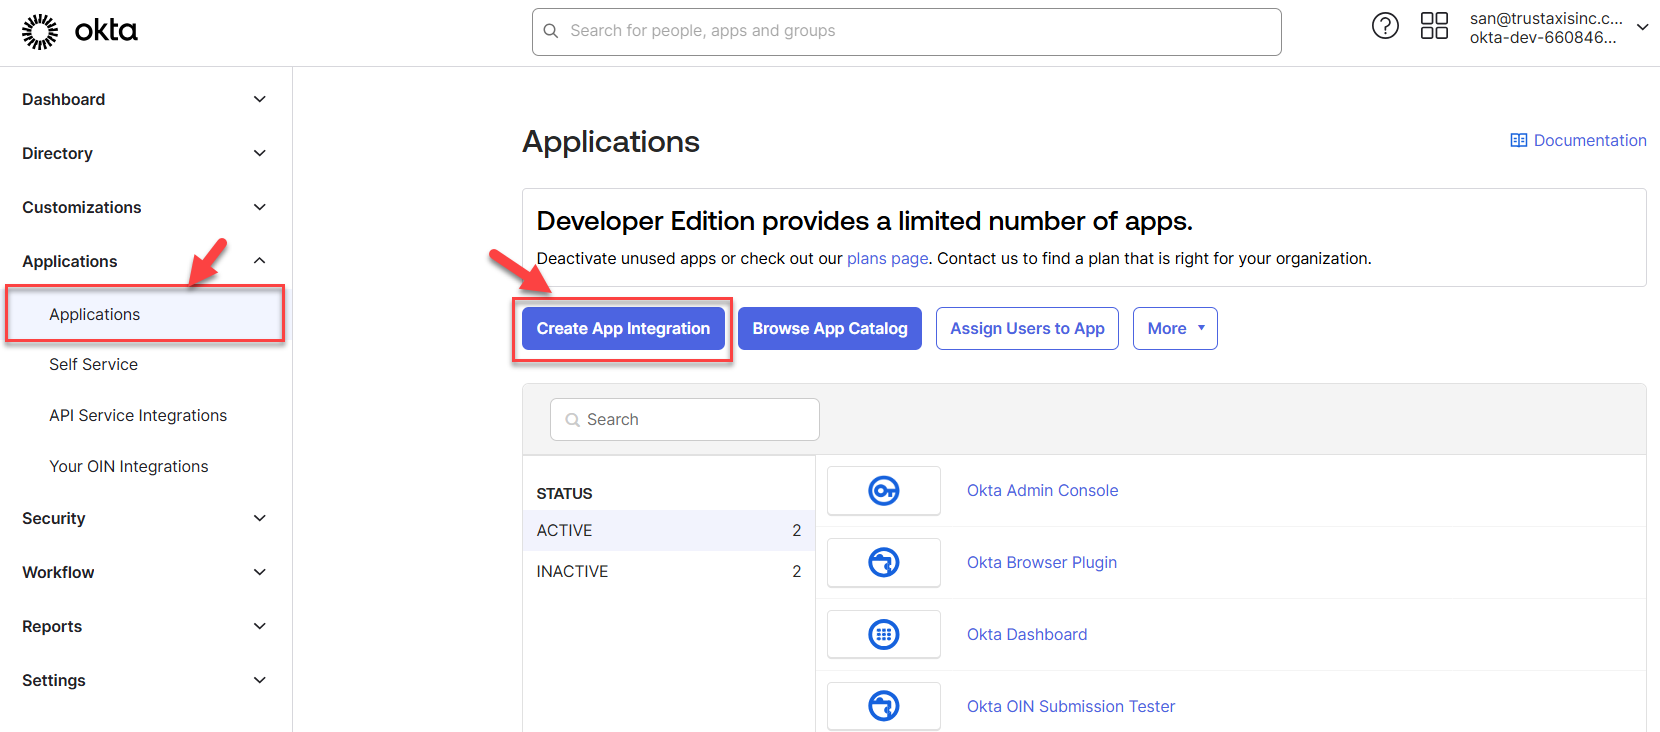
  1. Go to ApplicationsCreate App Integration 

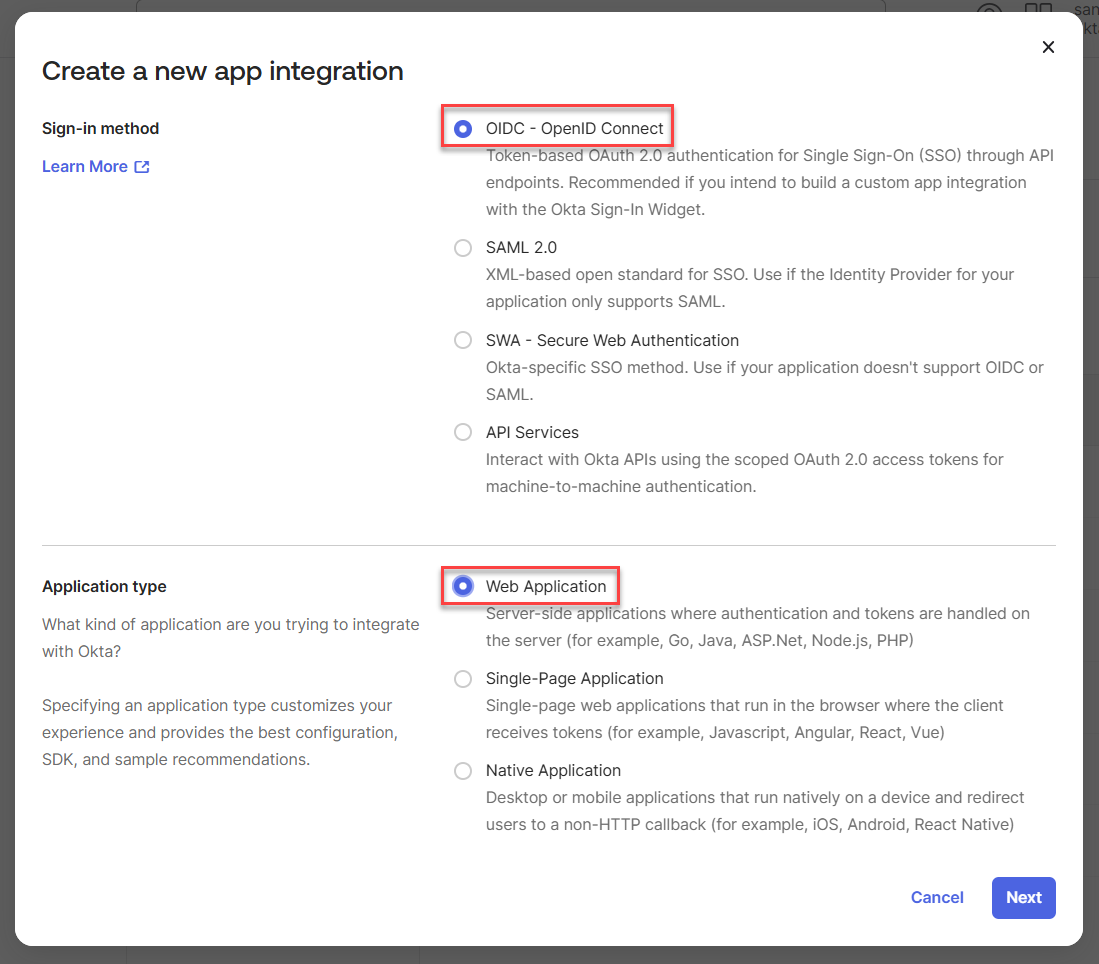
2.  Select:

  • Sign-in method: OIDC – OpenID Connect
  • Application type: Web Application
  • Click “Next”

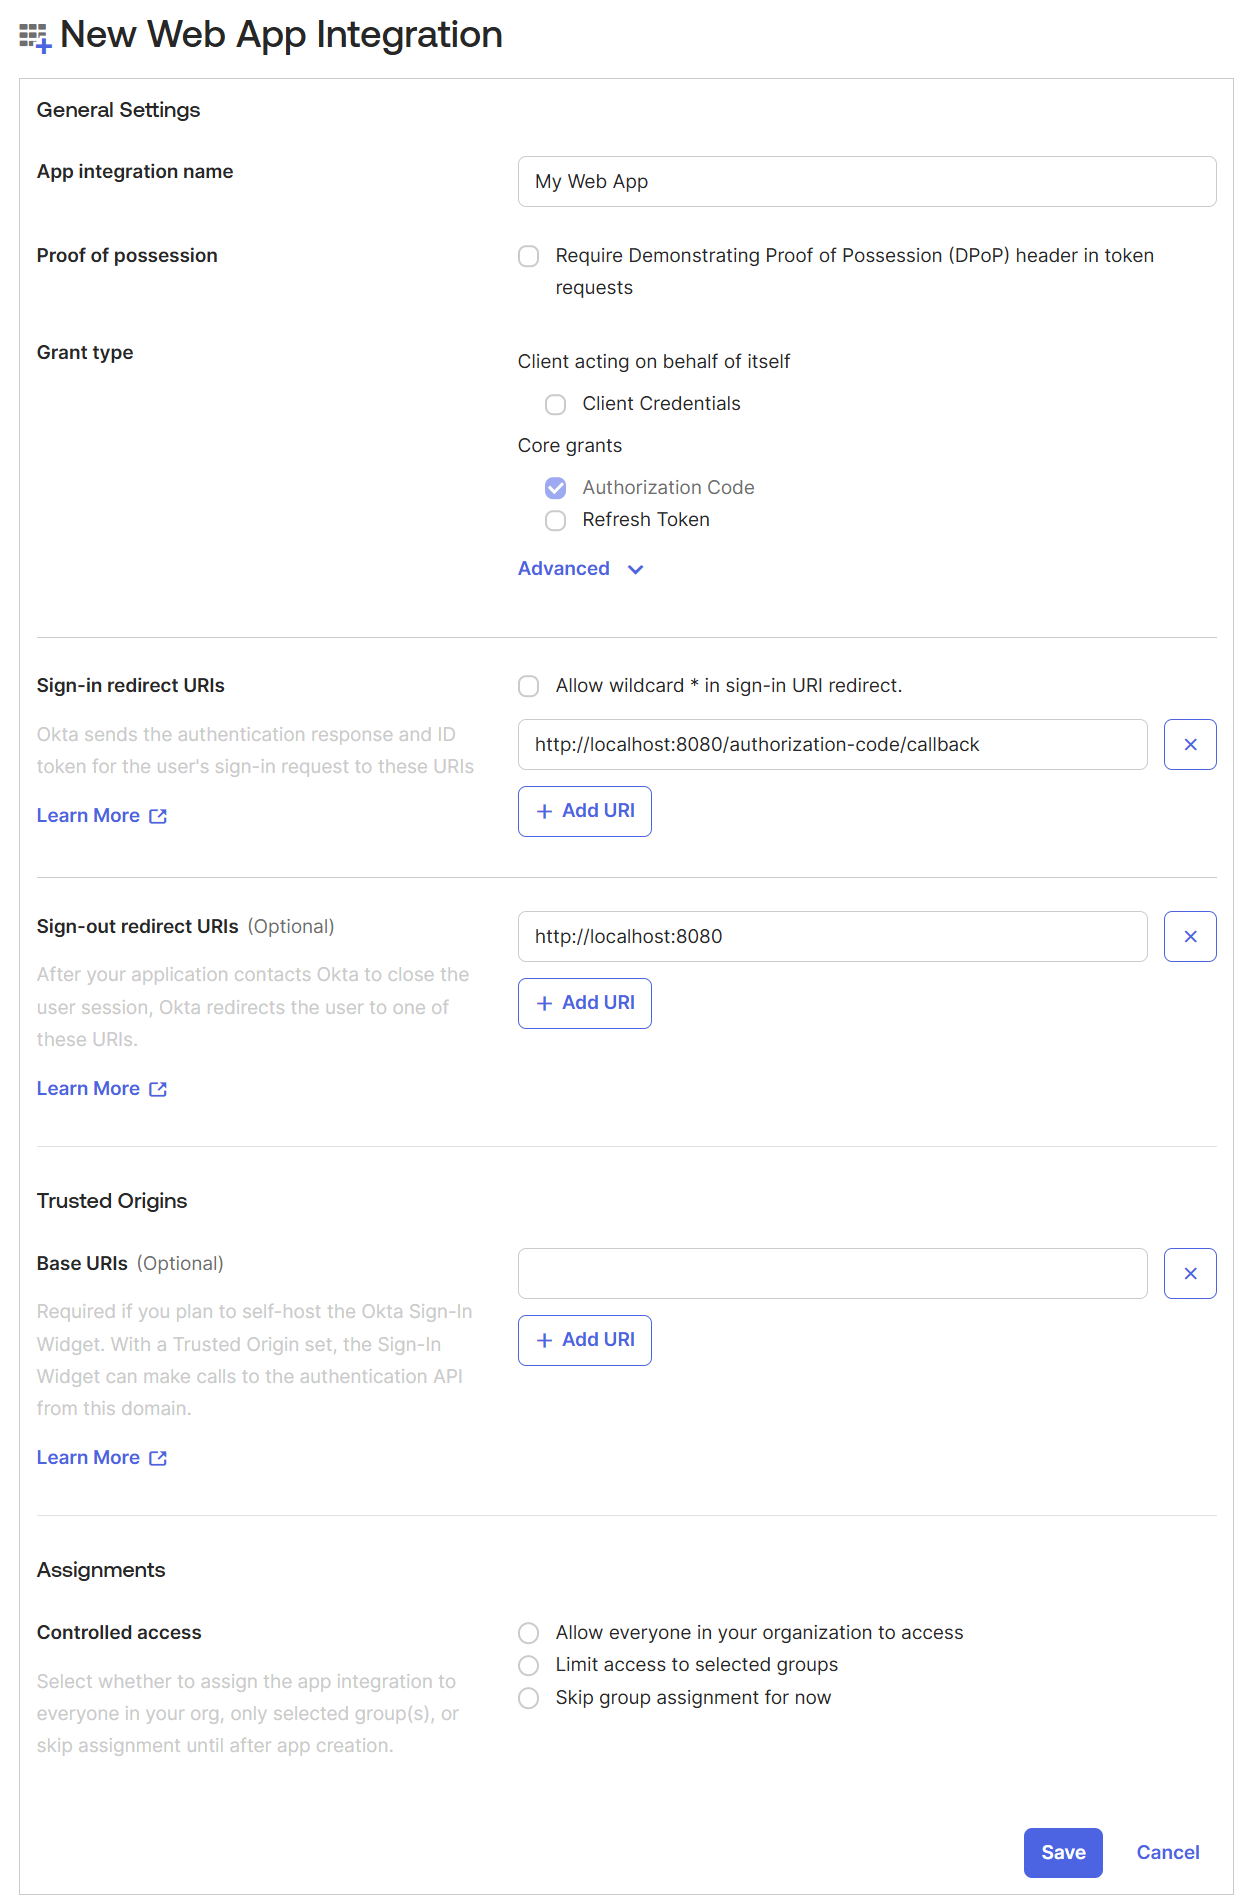
3.  Set Web App Integration Settings: 

  • App Name: PlainID SSO (Or any name you deem appropriate) 
  • Grant type: Check Authorization Code 
  • Sign-in redirect URI: Leave this blank for now. 
  • Sign-out redirect URI: Leave blank for now. 
  • Click Save to Generate 
Step 3: Configure Sign-in and Sign-out Redirect URIs in Okta:

After saving your app: 

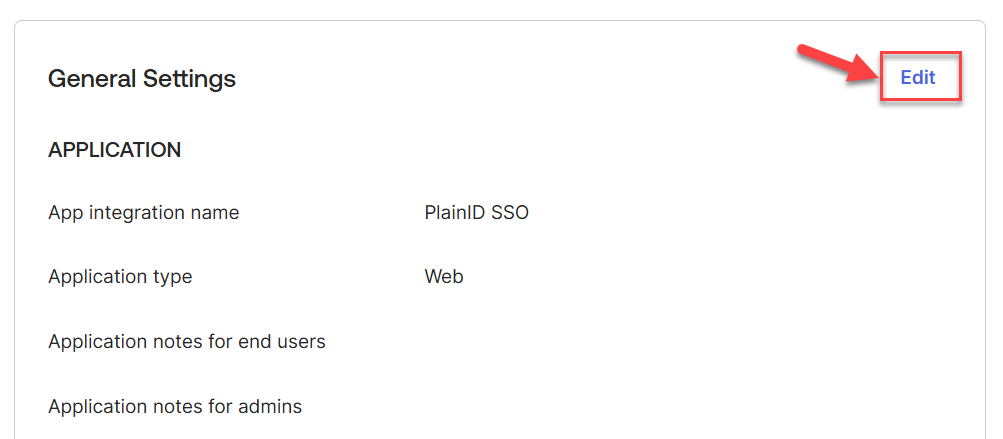
  • Scroll to the Login section under your app’s General settings 
  • Click Edit 

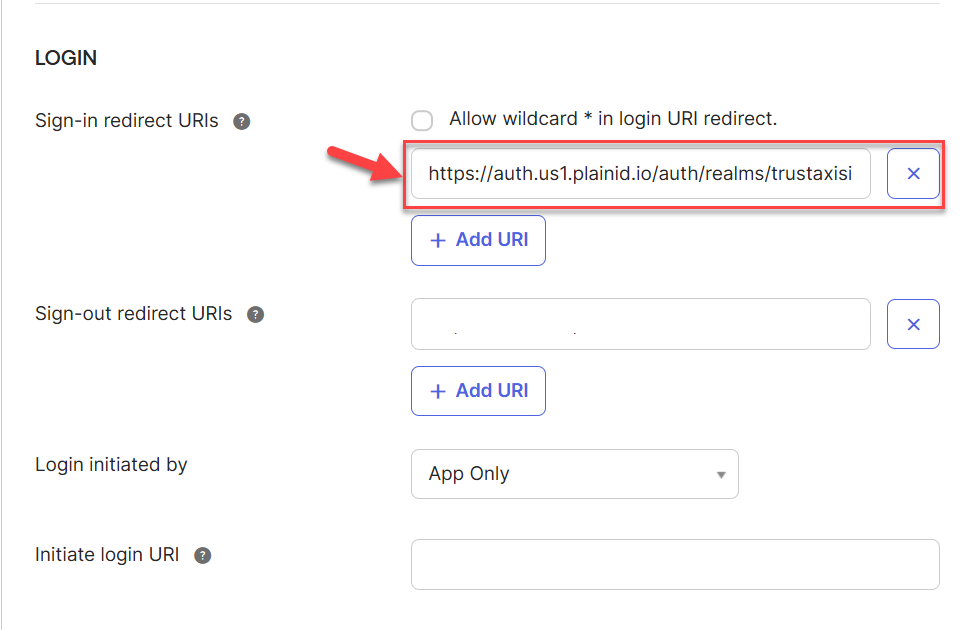
Copy the Sign-in Redirect URI from your PlainID tenant (Read warning before this implementation): 

  • Login to PlainID 
  • Click the gear icon on the top-right > Settings 
  • Go to Tenant IDP Settings 
  • Set IDP Source to External IdP 

⚠️ Important Warning: 

If you switch to External IDP without a working redirect URI or admin access recovery plan, you may get locked out permanently. Always test with a second “backdoor” admin account configured for internal login before switching. 

Paste this in the Sign-in Redirect URI in Okta.

  • Set Login initiated by to: App only 
Step 4: Configure the Sign-Out URL

Why This Is Important: 

When users log out of PlainID, the logout request is sent to Okta. Okta needs to know where to redirect users after logging out. If this isn’t configured correctly, users will get stuck with a 400 error like: 

Error: The ‘post_logout_redirect_uri’ parameter must be a Logout redirect URI in the client app settings 

How to Fix It: 

  1. Go to your Okta developer portal 
  2. Navigate to your application (e.g., “PlainID SSO”) 
  3. Click the General tab 
  4. Scroll down to the Login section 
  5. Click Edit 
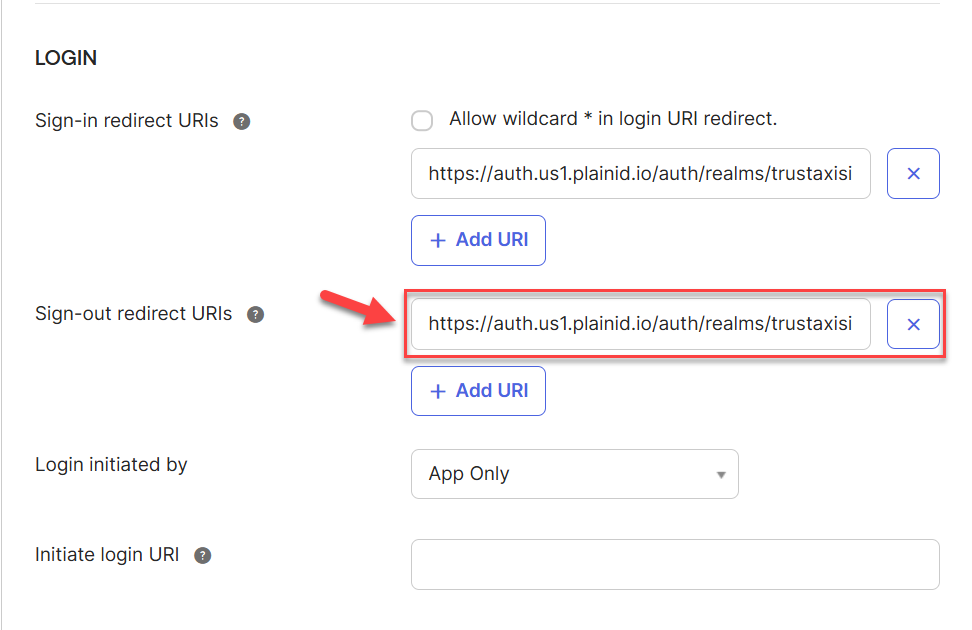
  6. In the Sign-out redirect URIs, add the following: 

https://auth.us1.plainid.io/auth/realms/<PlainID-Company-Name>/broker/tenant_idp/endpoint/logout_response 

(Replace <PlainID-Company-Name> with your actual PlainID Company Name. The company name will be present in your PlainID url, e.g., https://trustaxisinc.us1.plainid.io, here “trustaxisinc” is the company name) 

7.  Save the changes 

8. Confirm Logout Is Working 

After doing this: 

  • When users log out of PlainID, they will be securely redirected through Okta and returned cleanly without a 400 error. 
Step 5: Disable Federation Broker Mode (Optional but Recommended)

What Is It? 

Federation Broker Mode allows Okta to automatically assign users to apps based on their identity from external identity providers, but in this flow, you’re not assigning users explicitly because PlainID controls access. 

Problem: 

If Federation Broker Mode is enabled and you don’t assign users directly to the Okta app, users will get: 

You are not allowed to access this app. To request access, contact an admin. 

Fix: 

  1. Go to OktaApplications 
  2. Open the PlainID SSO app 
  3. Scroll to the bottom 
  4. Click the Edit button (top-right of the section) 
  5. Disable Federation Broker Mode 

This ensures Okta properly respects your OIDC flow via the PlainID side. 

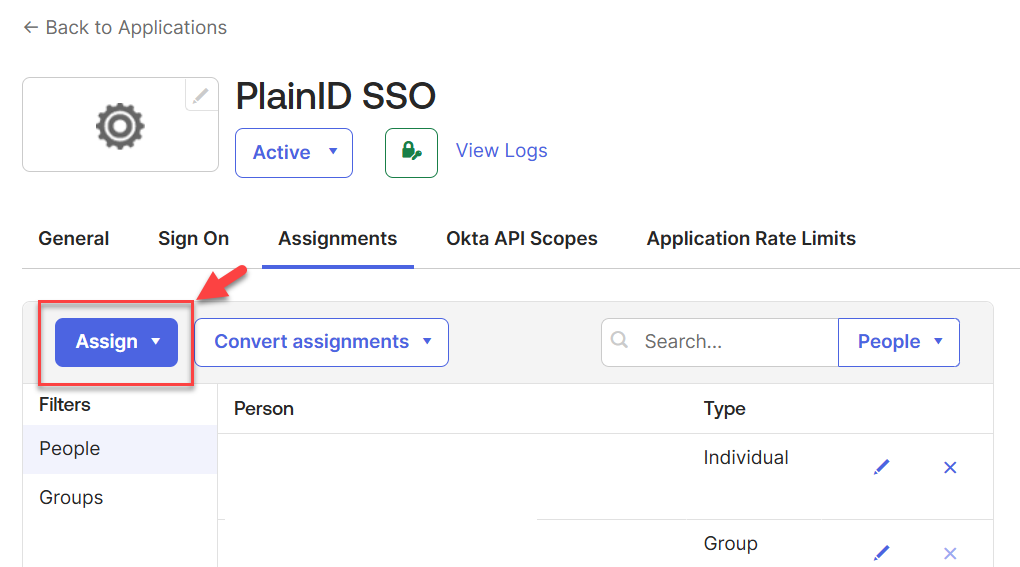
After doing so, you can go to Assignments Tab in Application settings and add users to the app manually. 

Step 6: Configure PlainID

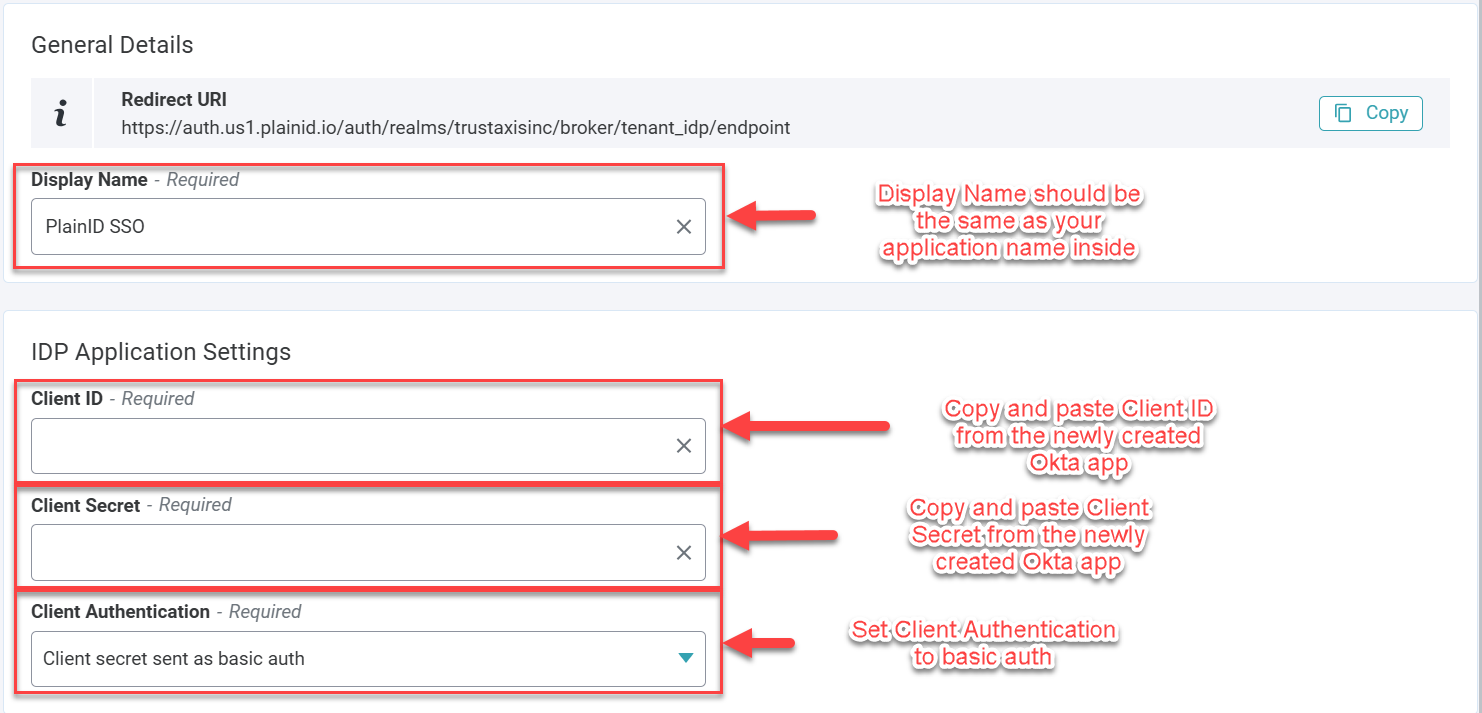
Log into PlainID → Go to Tenant Settings → General Details & IDP Application Settings 

  1. Scroll to the section titled General Details 
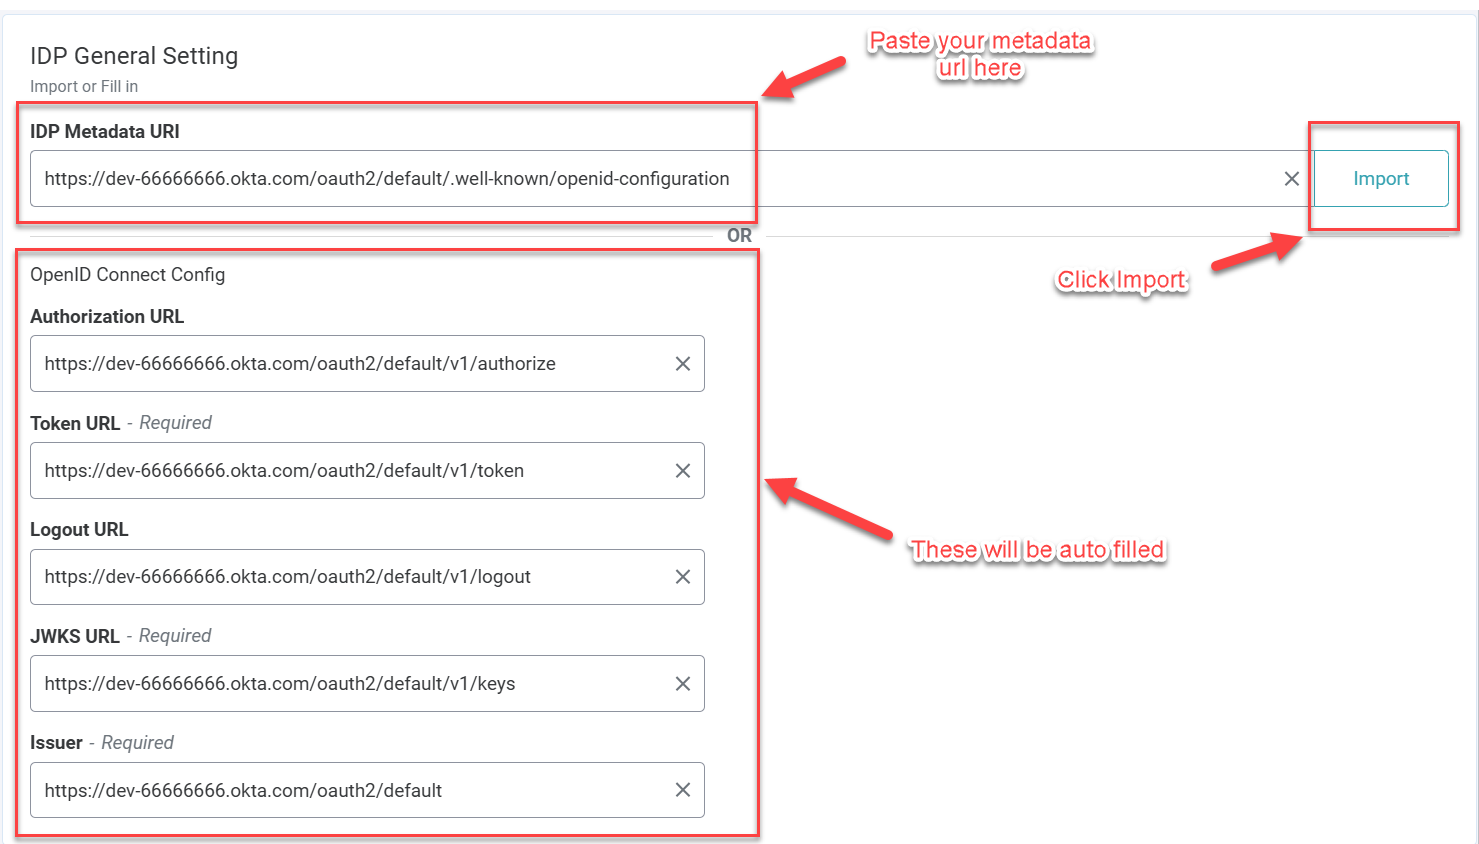
  2. Find the field labeled Metadata URL 

In Okta, your Metadata URL is: 

https://<your-domain>/oauth2/default/.well-known/openid-configuration
 

(Replace <your-domain> with your actual Okta tenant domain, e.g., dev-66666666.okta.com) 

3.  Paste this Metadata URL into the field in PlainID 

4.  Click the Import button next to it 

What Happens After Clicking “Import” 

PlainID will automatically fetch and populate the following fields using the Metadata URL: 

  • Authorization URL 
  • Token URL 
  • Logout URL 
  • JWKS URL 
  • Issuer 

This avoids manual entry errors and ensures consistency with your Okta configuration. 

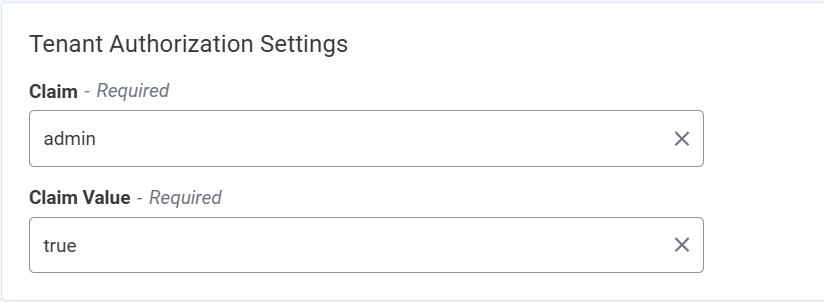
Also Complete the Following: 

Field  Value 
Claim Name  admin 
Claim Value  true 

This claim determines which users are granted admin access in PlainID. 

Step 7: Create Admin Claim in Okta

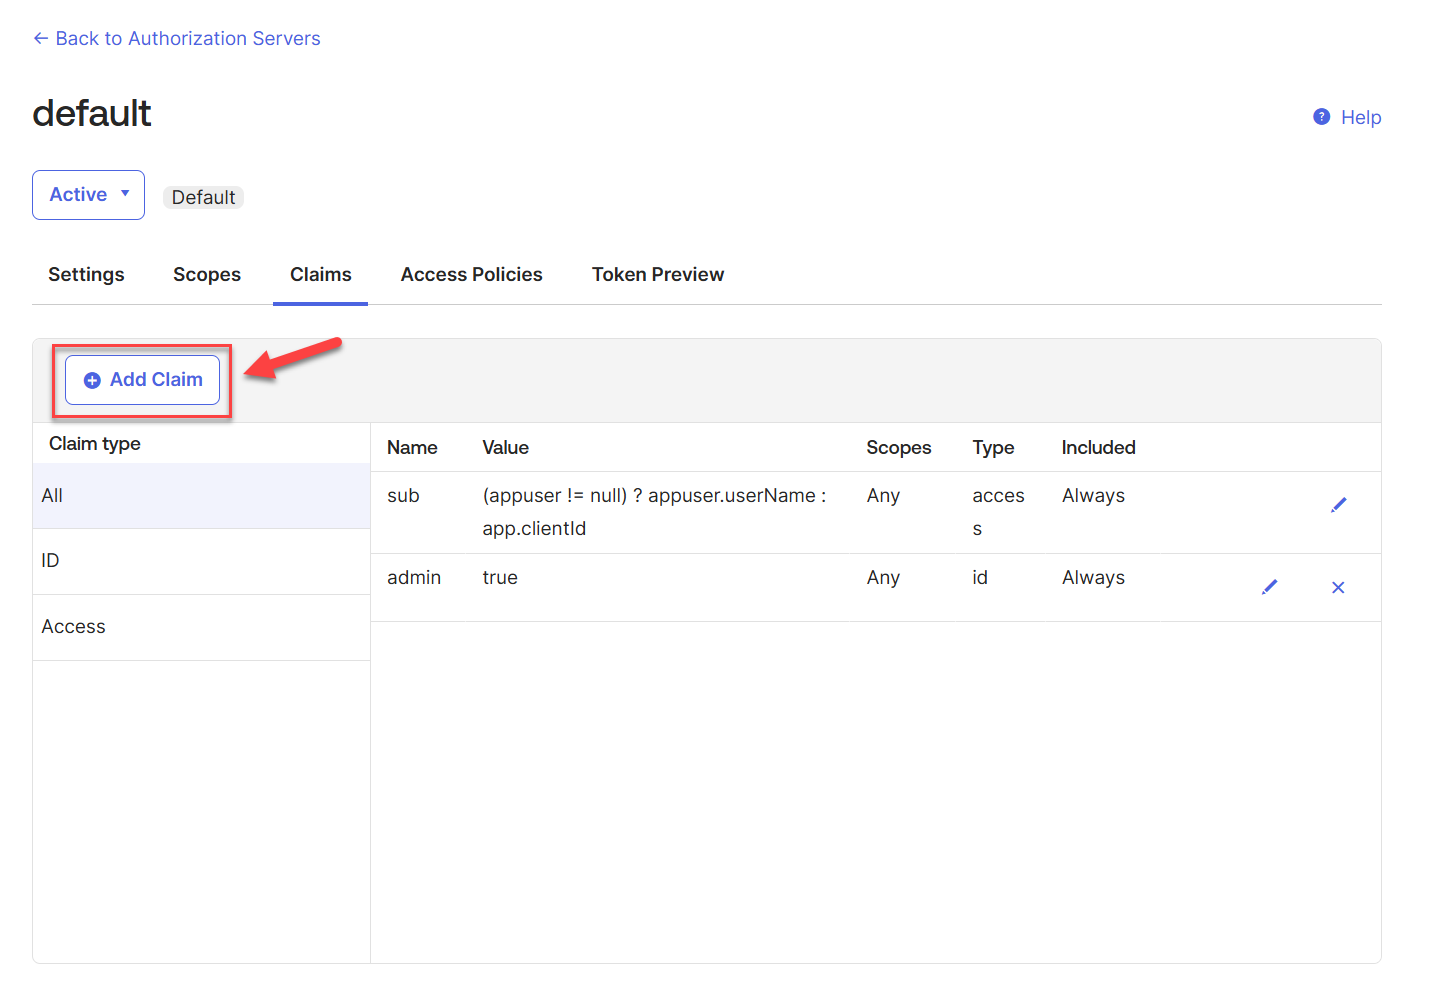
Go to your Okta Security → API → Authorization Servers → default → Claims: 

  1. Click Add Claim 
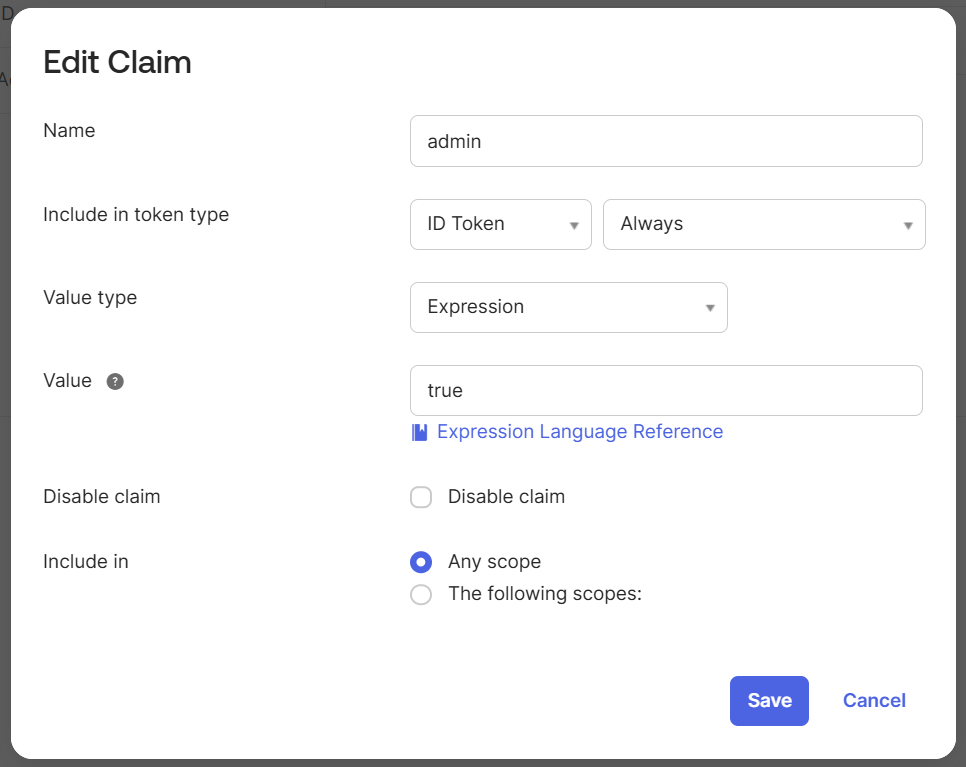
  2. Name: admin 
  3. Value type: Expression 
  4. Value: true 
  5. Token type: ID Token 
  6. Scope: Any 
  7. Include in token: Always 
Common Errors and Fixes

Error: “400 Bad Request – Policy Evaluation Failed” 

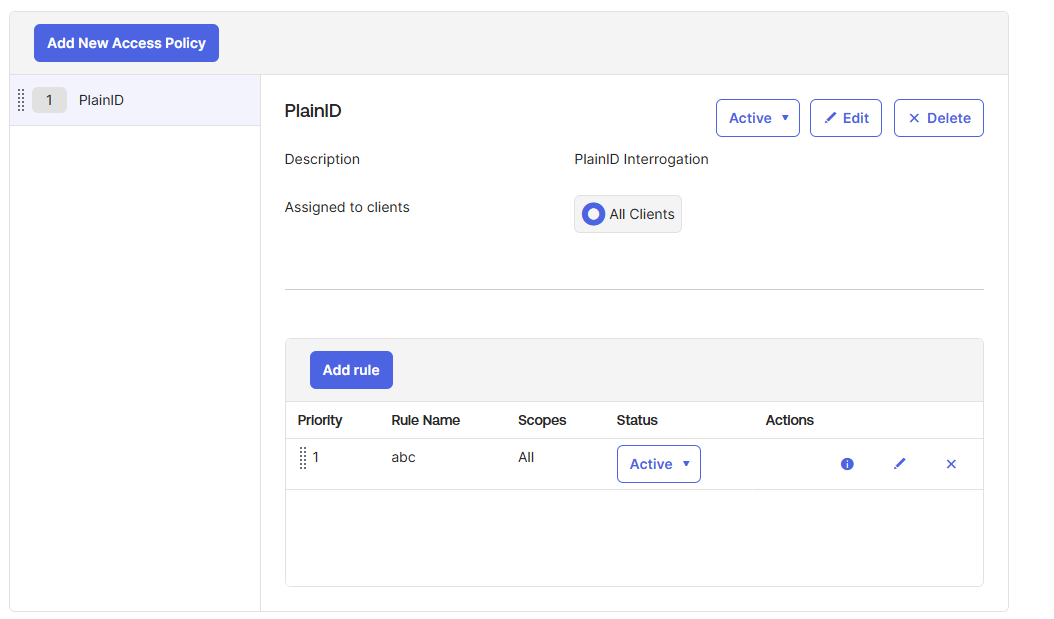
Fix: Ensure the correct Authentication Policy is attached to the app, and it allows federated IdP access. 


Error: “You are not allowed to access this app” 

Fix: You are likely not assigned to the application in Okta. Go to: 

  • User Profile → Applications → Assign Applications → select your app 

Note: If Federation Broker Mode is enabled, direct assignment might not be needed, but you still need proper token claims. 


Error: “Post_logout_redirect_uri must be in app settings” 

Fix: Go to the Okta app → General Settings and add the PlainID logout URL (or home URL) to Sign-out redirect URIs. 

Examples: 

  • https://auth.us1.plainid.io/auth/realms/<PlainID-Company-Name>/broker/tenant_idp/endpoint/logout_response 
Step 8: Testing SSO Login and Logout

Visit: 

https://<company>.us1.plainid.io 

This should redirect you to Okta, authenticate you, and return you to PlainID logged in. 

For logout, ensure the logout flow uses the same Okta URLs you’ve added to the sign-out redirect URIs.

Step 9: Adding New Users in Okta
  1. Go to Directory → People → Add Person 
  2. Enter user details and ensure: 
  • The user has the claim admin=true if you want them to access PlainID admin 
  • The user can authenticate using configured method (password or MFA) 

Users will log in using the same flow, redirect from PlainID to Okta. 

Final Checklist


Task  Status 
Okta Developer account created   
Web app created using OIDC   
PlainID configured with Okta metadata URLs   
ID Token Claim admin=true configured   
Authentication policy created and applied (Optional)  
Redirect URIs and logout URIs set   
Successfully authenticated into PlainID 
Conclusion

By following this guide, you’ve fully integrated Okta as an external IdP for PlainID using OIDC. This guide solves login and logout errors, explains how to assign users and access rights, and ensures you’re ready for production-level federation. 

This setup is perfect for enterprises moving towards policy-based access control (PBAC), with centralized identity and access governance. 

Keywords:

PlainID Okta Integration, Okta as External IdP, SSO Federation Setup, OpenID Connect PlainID, Okta Identity Provider Guide 

How AI is Revolutionizing Identity Governance

The Identity Crisis in Modern Enterprises

Imagine managing thousands of digital identities across hundreds of applications while ensuring the right people have exactly the right access at the right time—no more, no less. Now imagine doing that manually with spreadsheets and emails in today’s dynamic business environment.

This nightmare scenario is reality for many security teams and identity administrators. With the average large company deploying over 660 SaaS apps, traditional identity governance has hit a breaking point. The consequences? Access requests pile up, compliance becomes a spreadsheet nightmare, and improper access lingers undetected—often until it’s too late.

The Perfect Storm: Why Traditional Identity Governance Fails

The challenges creating this perfect storm are interconnected:

Scale and Complexity
When a single manager must manually review over 1,000 access items each quarter, human limitations become painfully apparent. Users accumulate excessive privileges over time (“entitlement sprawl” or “privilege creep”), creating a tangled web impossible to manage manually.

The Human Element
The Verizon Data Breach Investigations Report found a staggering 82% of breaches involve the “human element”—misused credentials or errors. More concerning, a recent study discovered 99% of cloud identities had excess privileges. Every unnecessary permission is a potential attack vector or security vulnerability.

This broken system creates an unsustainable cycle: overwhelmed managers “approve all” during access reviews, defeating the purpose of governance, while IT teams drown in mundane access tasks instead of focusing on strategic security initiatives.

Enter Artificial Intelligence: The Game-Changer

AI is transforming identity governance and administration from a reactive, labor-intensive exercise into something far more powerful. Let’s explore how intelligent automation is revolutionizing this field.

Finding Needles in the Access Haystack
AI excels at pattern recognition across massive datasets—precisely what’s needed to spot risky outliers. By analyzing peer group behavior, machine learning can flag when someone’s access deviates suspiciously from others in similar roles, identifying potential identity risks before they materialize.

This capability alone transforms governance from backward-looking compliance to proactive risk management and threat prevention.

Real-World Impact: The Numbers Don’t Lie

Organizations implementing AI-powered identity governance and identity security are seeing remarkable results:

  • RWE (Energy): Reduced user onboarding from 25 days to less than 3 hours
  • ECU Health: Compressed access provisioning from weeks to approximately 4 hours
  • PG&E (Utilities): Virtually eliminated “rubber-stamp approvals” by using AI to auto-approve low-risk access while highlighting truly concerning entitlements

One company identified and eliminated over 11,000 hours of excess access rights that would have gone undetected through traditional methods. Another found that 84% of risky access discovered by AI would have been missed entirely by manual reviews and certifications.

The Intelligence Engines: Key Players in the AI-Powered Identity Space

Several vendors have emerged as leaders in this space:

SailPoint Identity Security Cloud
SailPoint’s Predictive Identity™ uses artificial intelligence to recommend appropriate access, identify peer group anomalies, and auto-discover new access that needs governance. Their identity management platform has been adopted by nearly 46% of Fortune 500 companies.

Saviynt Enterprise Identity Cloud
Saviynt’s Intelligence Suite features an advanced recommendation engine that evaluates peer groups and usage patterns while filtering out high-risk suggestions. Their AI Copilot guides managers through access certification decisions in plain language, reportedly reducing certification fatigue by up to 75%.

Okta Identity Cloud
Okta combines identity and access management with AI-driven threat protection that detects credential attacks by spotting anomalous login patterns. Their Policy Recommender suggests stronger access policies based on insights from across their customer base.

Implementation: A Strategic Journey, Not Just a Technology Deployment

Successfully implementing AI in identity governance requires a thoughtful approach:

  1. Start with clear objectives – Define specific goals like cutting access request time or reducing unnecessary privileges
  2. Focus on data quality – AI is only as good as the data it learns from
  3. Begin with low-hanging fruit – Automate routine processes first to build confidence
  4. Implement risk-based policies – Configure how AI measures risk and what actions to take
  5. Involve stakeholders early – Train users and ensure they understand the benefits
The Future Horizon: Where AI and Identity Governance Are Heading

As this technology matures, several exciting trends are emerging:

Continuous Authentication and Zero Trust
Traditional authentication happens at login, but the emerging model leverages AI to continuously validate that a user’s behavior and risk level justify ongoing access—a foundational element of Zero Trust security and advanced access control.

Behavioral Analytics
Beyond static role analysis, advanced behavioral analytics are establishing baselines of “normal” activity for each identity. Deviations can trigger responses ranging from additional verification to access revocation, creating a more dynamic security posture.

But we’ll explore these future identity governance trends in detail another time…

The Bottom Line: Transform or Fall Behind

Identity governance is at a crossroads. Traditional approaches are breaking under the weight of digital transformation, but AI offers a timely solution. The organizations embracing AI for identity governance now are not only solving today’s challenges but building a foundation for adaptive, resilient security for years to come.

The future of identity governance is intelligent, automated, and proactive. The only question is: will your organization be part of it?

The Ultimate PlainID Caching Cheat Sheet

The Ultimate PlainID Caching Cheat Sheet: Turbocharging Your Authorization Engine

Picture this: Your meticulously designed authorization system is humming along beautifully in development, but when it hits production with thousands of simultaneous users, it suddenly feels like you’re watching paint dry. Each permission check crawls, API responses lag, and before long, your Slack channels light up with the dreaded question: “Why is everything so slow?”

Sound familiar? You’re not alone.

Authorization decisions can quickly become performance bottlenecks, especially when they require fetching data from multiple external systems. Fortunately, PlainID offers a robust set of caching mechanisms that can transform your authorization engine from a tortoise to a hare. Let’s dive into the art and science of PlainID caching.

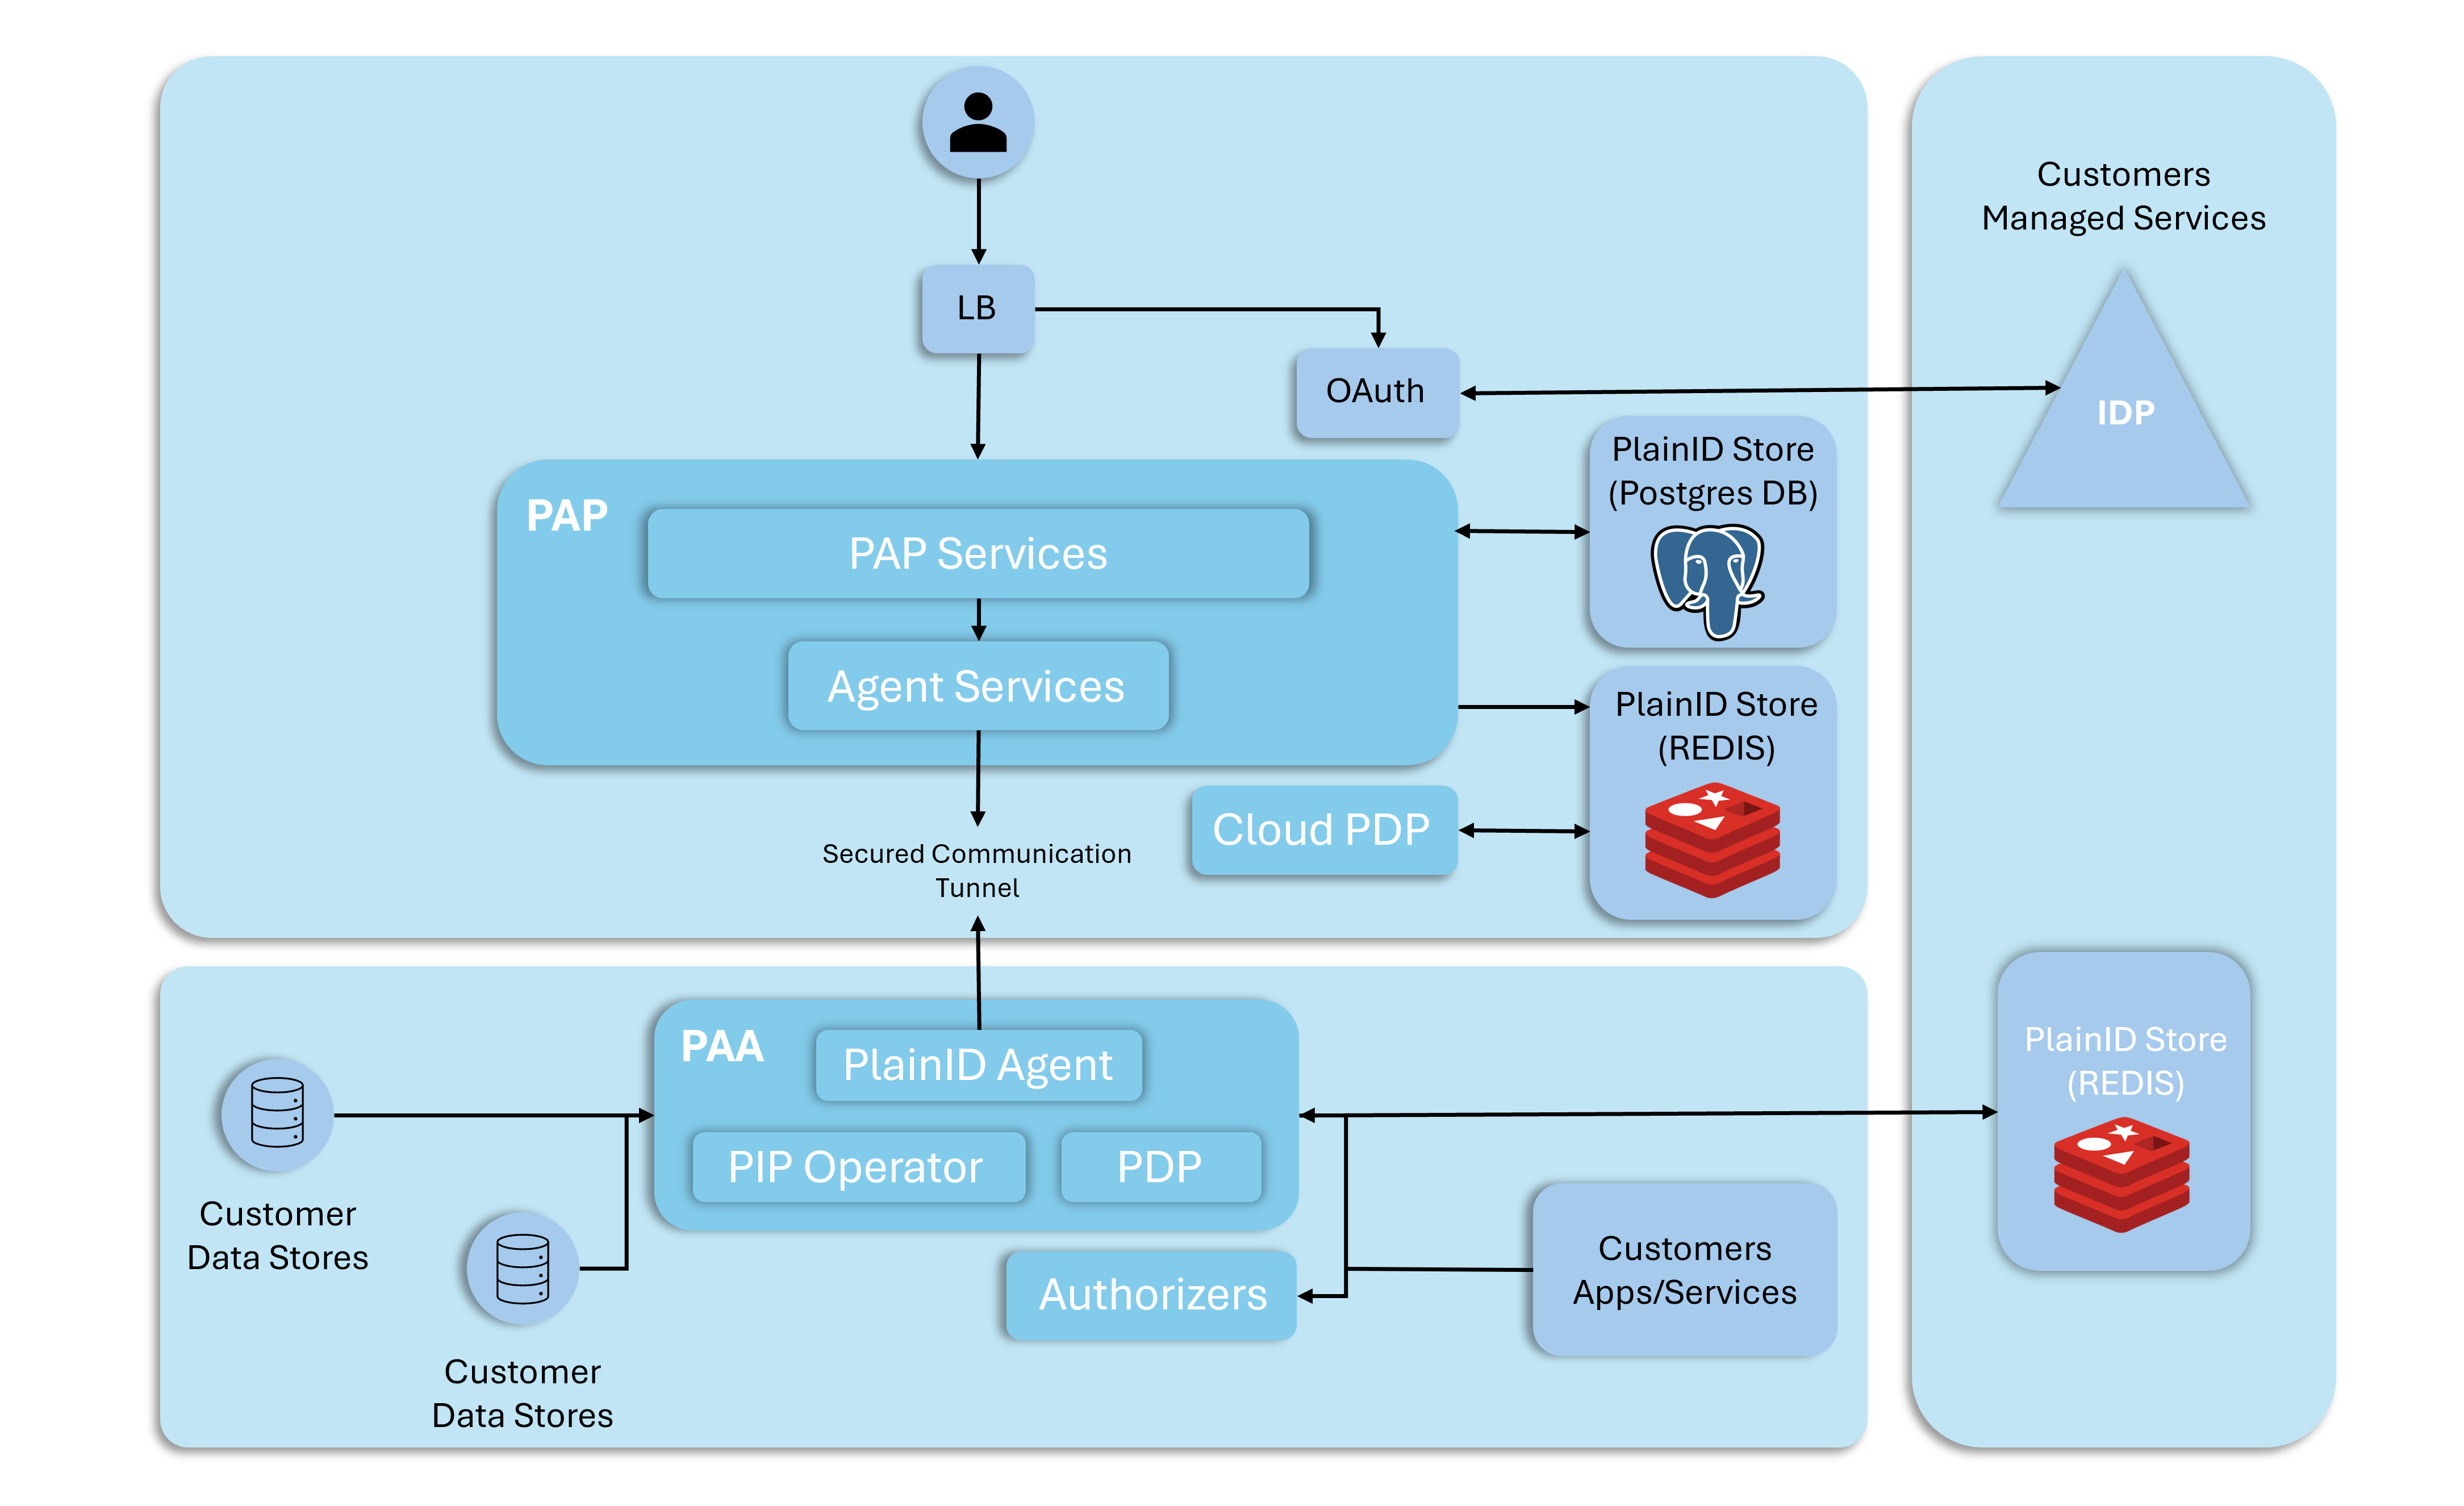
We’re focusing specifically on application-level caching magic here, so we won’t be diving into the PlainID Store (aka  policy caches) that PlainID uses behind the scenes.  Those Redis caches (see picture below) are quietly doing their thing, keeping policies handy right next to your Policy Authorization Agents (PAAs)-think of them as trusty sidekicks making sure the policies stay close (to the points of consumption i.e., the PEPs associated with each PAA) and easily accessible.

Policy Decision Cache: Your First Line of Defense

Have you ever watched a toddler ask the same question 37 times in a row? That’s essentially what your authorization system experiences when bombarded with identical requests. The Policy Decision Cache puts an end to this madness.

Imagine your marketing team accessing the same dashboard repeatedly throughout the day. Without caching, PlainID recalculates the exact same authorization decision every single time—checking policies, fetching attributes, and evaluating conditions from scratch. It’s like solving the same puzzle over and over.

PlainID3

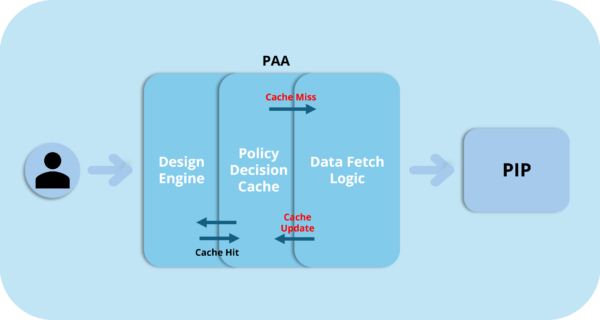
With Policy Decision Cache enabled, PlainID thinks: “Haven’t I seen you before? I already know the answer to this!” And boom—instant response.

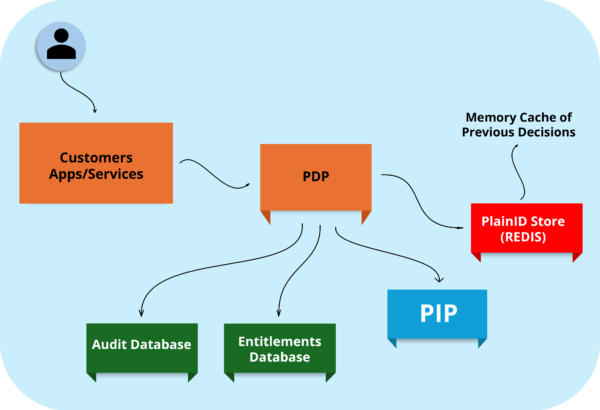
The secret sauce: This is cached right next to the PDP (Policy Decision Point) in the Redis store, ready to serve the exact permission decisions whenever identical scenarios pop up. So, when the same user asks for access to the same resource under the same conditions, PlainID quickly serves up the stored answer—no need to crunch the numbers all over again.

Where to find it: Navigate to Environment Settings → Scopes → Cache Duration. This is your control center, where you decide how long cached decisions stay fresh before they’re recalculated. And yes, it’s scope-dependent, giving you the freedom to choose on an app-by-app basis exactly who gets to enjoy cached responses—and who needs real-time decisions every single time. Even better, apps with caching enabled can dynamically tell the PDP to skip the cache whenever their specific authorization scenario calls for it. Now that’s some impressive flexibility, wouldn’t you agree?

Real-world impact: One of our clients reduced authorization response times from 200ms to under 10ms for common scenarios—a 20x improvement that transformed their user experience overnight.

PlainID2

Identity Source Cache: Stop Playing 20 Questions With Your Identity Provider

If Policy Decision Cache is your first line of defense, Identity Source Cache is your second. And it’s a game-changer, especially if your IdP isn’t exactly speed-demon material.

Think about it: Every time PlainID needs to make an authorization decision, it might need to know things like “What department is Jane in?” or “Is Bob a member of the Finance group?” Without caching, PlainID has to phone home to your identity provider or the supplementary attribute source for every single check.

It’s like calling your mother every time you need to remember a family recipe instead of writing it down. Charming once, exhausting after the tenth time.

Identity Source Cache lets PlainID remember these details for a period you define. Your IdP will thank you, so will that sneaky but slow attribute source that holds your identity metadata, and your users will never know the difference—except things will just work faster.

The clever bit: This cache stores identity attributes fetched from external sources, so PlainID doesn’t need to query the same data. It’s particularly valuable when your identity provider is in another data center or cloud region where network latency comes into play. Or if the source is just slow by nature – i.e., a user attribute source hiding behind a slow API call.

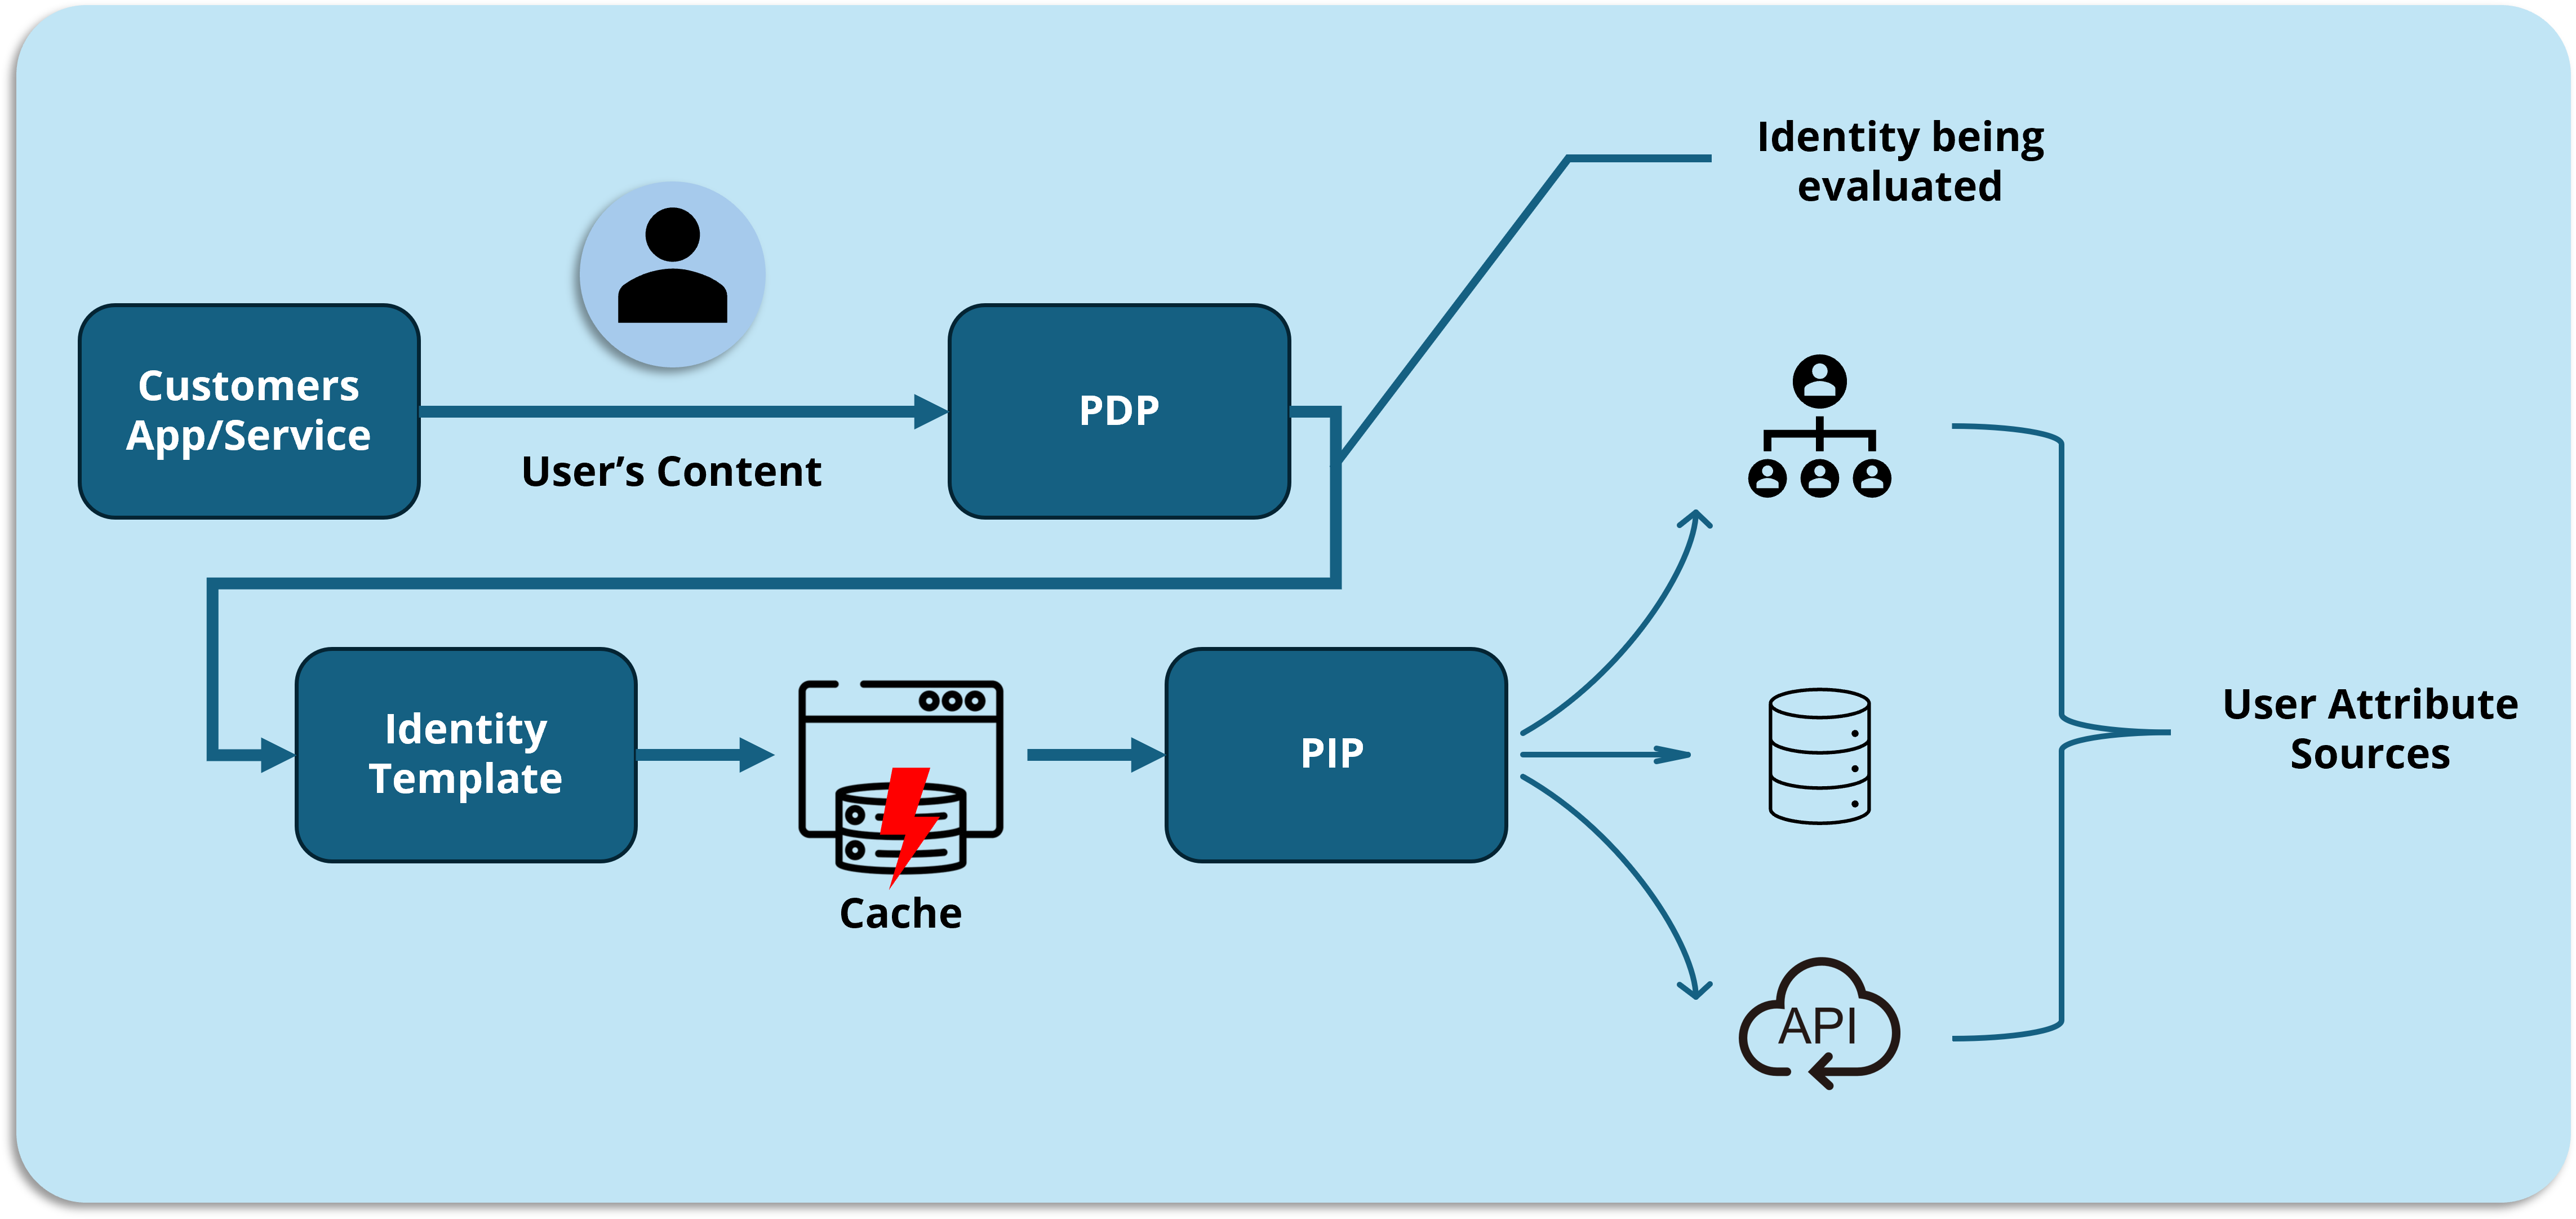
Where to tweak it: Find it under Identity Workspace Settings → Attribute Sources → Cache Duration. The default is 0 seconds (no caching), but for attributes that rarely change—like department or job title—consider longer durations.  Each attribute in the Identity Template has a source, you can set up the slower sources to be cached for longer durations.

Pro tip: Different attributes can have different volatility. Department changes might be rare (cache longer), while group memberships might change frequently (cache shorter or not at all). Tune accordingly – see above.

Policy Information Point (PIP) Cache: Where the Real Magic Happens

Now we’re getting to the heavy hitters. If your authorization decisions depend on data beyond simple identity attributes—think entitlements stored in databases, account statuses in CRMs, or risk scores from security tools—PIP Cache is about to become your new best friend.

Imagine making an authorization decision that needs to check if a customer account is in good standing before allowing a support rep to access it. Without caching, each permission check means a trip to your CRM API. If your CRM is having a bad day (and don’t they all occasionally?), your entire authorization system suffers.

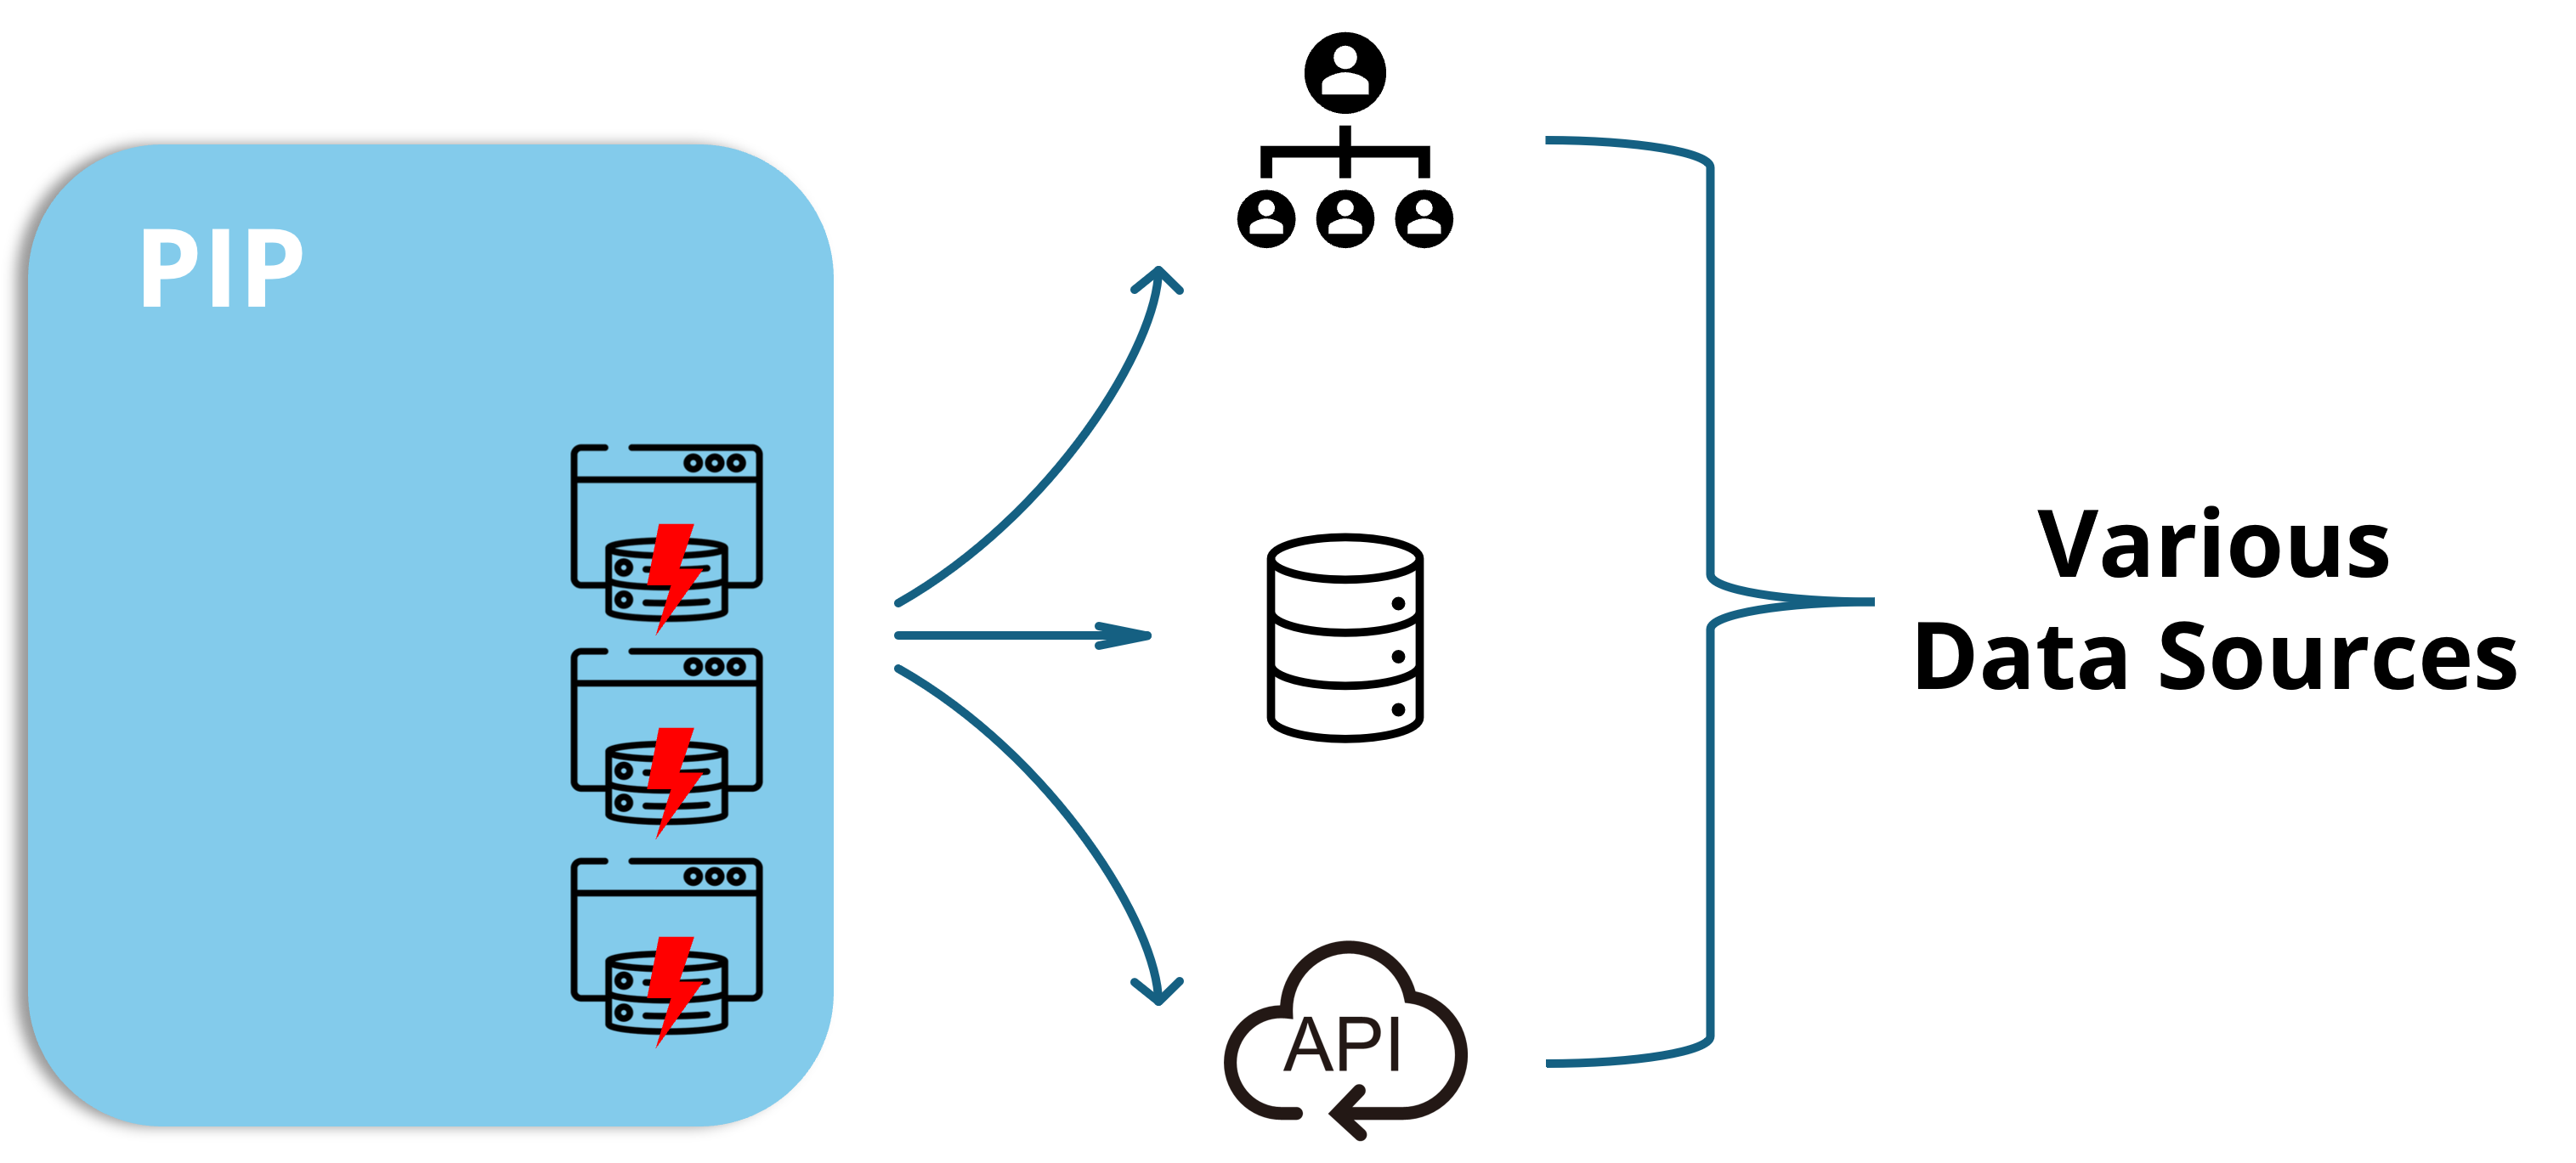
PIP Cache breaks this dependency chain by keeping a local copy of this external data, refreshed at intervals you control.  The cache is based upon a view that is created inside the PIP and can potentially involve multiple data sources at the same time.  More on PlainID PIP Views here.

Two flavors, both delicious:

  • Persistent Cache stores view data in a database, surviving service restarts and providing consistent performance even after maintenance windows.
  • In-Memory Cache keeps everything lightning-fast in RAM—ideal for high-throughput scenarios where every millisecond counts (though it does consume more memory).

One enterprise client used PIP caching to reduce their dependency on an overloaded SAP system. Before caching, authorization decisions took up to 2 seconds when SAP was under load. After implementing PIP cache with a 15-minute refresh interval, decisions consistently returned in under 50ms—regardless of SAP’s mood swings.

The beauty of PIP caching is that it creates a buffer between your authorization system and the unpredictable performance of external systems. Your authorization decisions become consistently fast, even when integrated systems are struggling.

Lazy Caching: For When the Data Universe Is Too Vast

Sometimes, the data universe is simply too vast to cache completely. Imagine an e-commerce authorization scenario where permissions depend on product data, and you have millions of products. Pre-caching the entire catalog would require enormous resources and might take longer than the cache refresh interval itself—a Sisyphean task if there ever was one.

Enter Lazy Caching—the procrastinator’s approach to data management (but in a good way).

Lazy Caching takes a “just in time” approach. Instead of trying to cache everything upfront, it captures data as it’s requested and keeps it around for subsequent requests. Like a squirrel gathering only the nuts it actually needs, this approach is efficient and practical.

There is no tweakable TTL, this feature is mostly a black box, but I have been told that an LRU (Least Recently Used) policy is utilized, Lazy Caching keeps the most relevant data ready while letting rarely-used data age out. It’s the perfect solution for massive data sets where only a fraction is accessed regularly.

The ninja move: Configure this via the configmap of the Runtime in the “plainid-runtime-config.yaml” file by appending the appropriate parameters to the PIP-Operator URL. I.E.,

{ jdbc:teiid:vdb@mm://<pip-operator-host>:<port>;resultSetCacheMode=true }

A global financial institution using PlainID for transaction authorization faced a challenge with their product database containing over 10 million items. Attempting to pre-cache all this data was simply not possible. Switching to Lazy Caching solved the problem elegantly—the system now maintains a cache of only the most frequently accessed products, which covers 80% of all authorization requests.  There is still some slowness on a cache miss, but not as bad as it used to be.

Putting it all together:

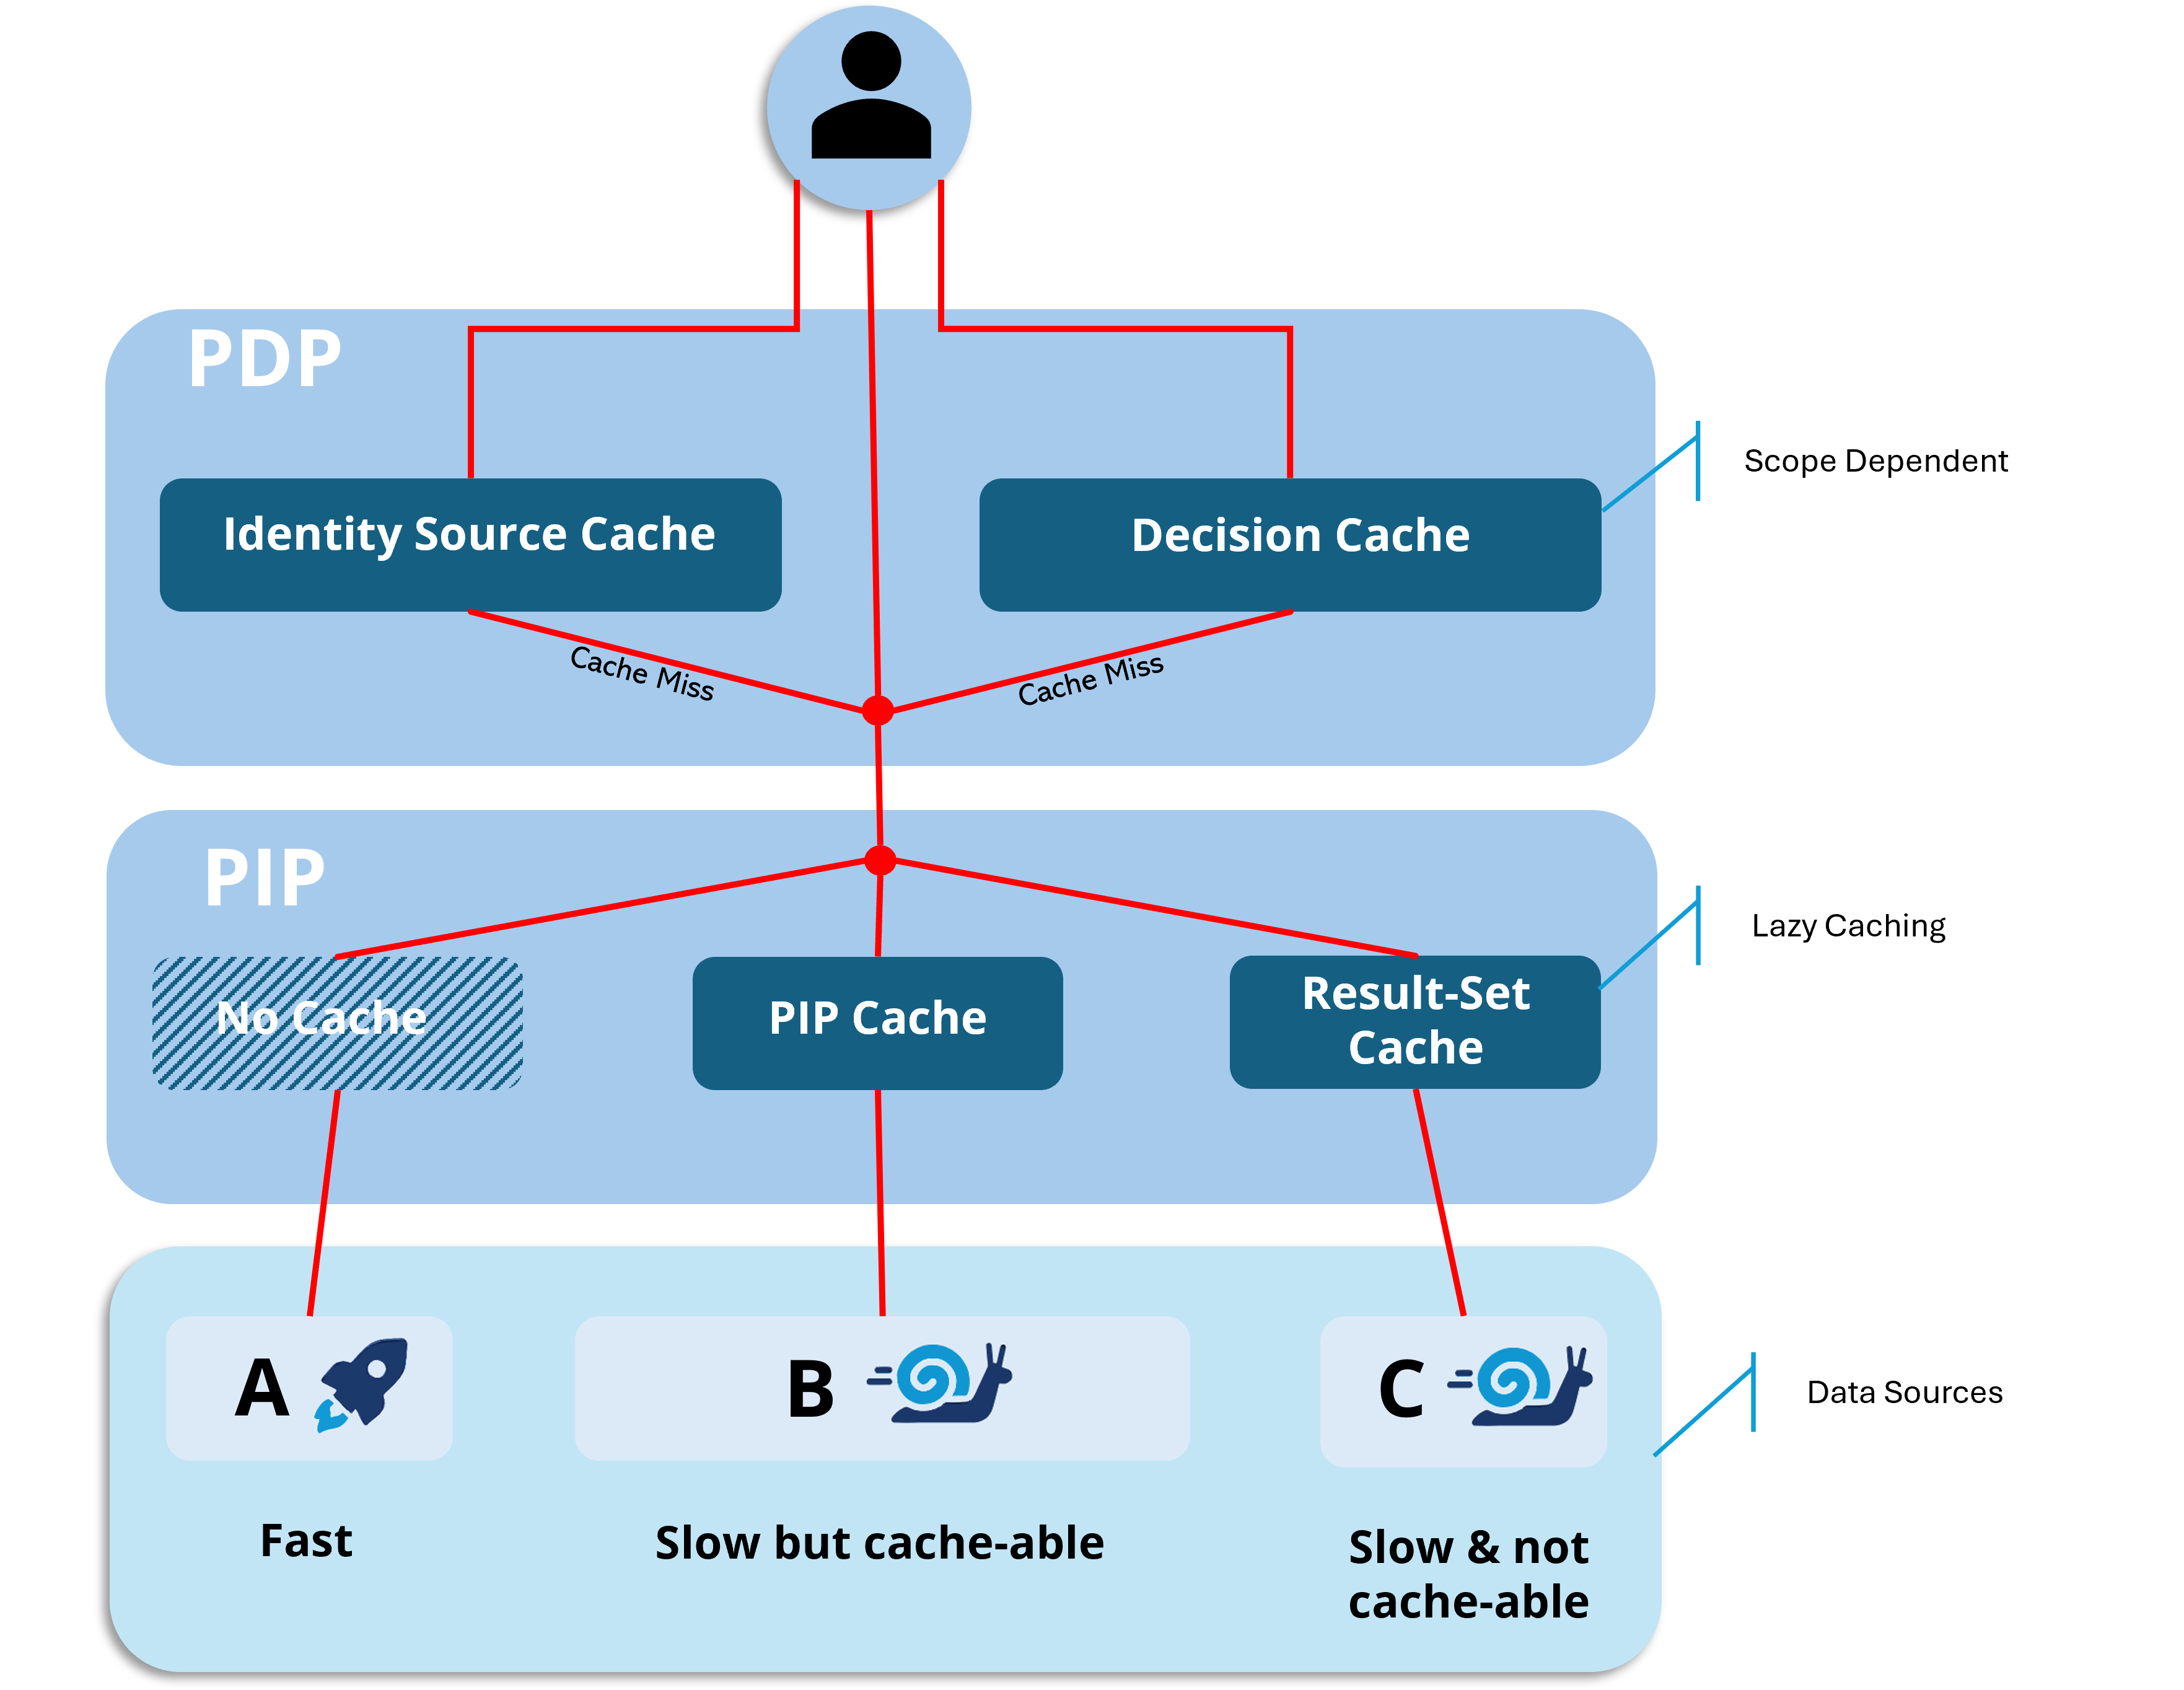
Together, these caches deliver serious synergy—PlainID cleverly blends all these caching strategies to squeeze out the best possible performance. In the diagram below, I’ve mapped out how each cache does its thing individually and how layering them up boosts your authorization response times to maximum snappiness. And let’s not forget the incredible flexibility this hands to your dependent apps—truly caching at its finest!

The Supporting Cast: Specialized Caches

While the four horsemen above will tackle most of your performance challenges, PlainID includes a couple of specialized caches worth knowing about:

JWKS Cache keeps JWT validation keys in memory, validating API calls more efficiently. Configure this in the values-custom.yaml file by adjusting the REFRESH_JWKS parameter (default: 3600000 ms). Unless you’re dealing with unusually high API volumes or JWKS endpoint instability, the defaults work well for most deployments.

Secrets Cache reduces calls to your Secret Manager when the PDP needs to sign JWT responses. The PDP monitors for certificate changes every minute and automatically refreshes its cache as needed. This one runs on autopilot, so you can safely ignore it until you dive deep into JWT response optimization.

Crafting Your Caching Symphony

The art of caching is knowing not just how to enable each cache, but how to orchestrate them into a cohesive performance strategy. Here’s a simple framework for approaching PlainID caching holistically:

  1. Kick off your caching adventure by enabling the Identity Source Cache to ease the burden on your IdP and other identity attribute sources. Before you do, sit down with your organization’s “identity overlords” to pin down how quickly authorizations need to reflect any updates to identity data. Some businesses can live with a slight delay, while others insist on near-instant freshness.
  2. Layer in PIP Caching for external data dependencies. It’s usually a simple call—chat with the folks who own those data sources to find out how often their info changes and how flexible your authorization engine can be with slightly outdated data.
  3. Now it’s time to unleash the Policy Decision Cache for quick wins with minimal hassle. Unlike the first 2 systemic caches, you can enable this on a per-application basis, letting less sensitive apps reuse old decisions for longer, while those needing near-real-time accuracy get a shorter cache—or skip caching entirely.
    The real key here is how often the same app requests the same authorization decision. If it’s a low-frequency scenario, a short cache won’t offer much benefit. You’ll need to weigh whether the business can handle stale decisions over an extended period. If the answer is no, then zero caching might be your best bet, and you can count on the first two caches to work their magic. In the end, it’s always a compromise.
  4. Implement Lazy Caching for very large data sets
  5. Monitor, measure, and tune each cache based on real-world patterns

Remember that optimal cache durations balance performance gains against data freshness. Too short, and you’re barely caching; too long, and you risk decisions based on stale data.

The Last Word on Caching

Caching in PlainID isn’t just about making things faster—it’s about creating resilient authorization systems that maintain performance even when external systems falter. It’s about ensuring that authorization never becomes the bottleneck in your application stack.

The difference between a well-cached and poorly-cached PlainID deployment can be the difference between snappy, responsive applications and frustrated users wondering why every click feels like wading through molasses.

So go forth and cache wisely. Your users may never know what you did, but they’ll feel the difference. And in the world of authorization, being invisibly excellent is the highest praise of all.


Have you implemented caching in your PlainID deployment? What challenges or successes have you experienced? Share your stories in the comments below!

The art of the possible!

Replacing SAP GRC with SailPoint ISC

The Silent Crisis in SAP Governance

Picture this scenario: Your company runs critical operations on SAP, managing financials, HR, supply chain, and more. Everything seems to be working fine until your auditors deliver troubling news. Despite investing heavily in SAP GRC 10.x for years, your compliance gaps are widening, not shrinking. Manual processes are overwhelming your team, and SAP is nudging you toward a costly upgrade to version 12.x or their cloud solution.

Sound familiar? You’re not alone.

For thousands of organizations worldwide, SAP systems represent the digital backbone of their operations. Yet many are discovering that SAP’s native governance solutions, particularly aging GRC 10.x implementations, are creating more problems than they solve in today’s complex IT environments.

The most troubling part? SAP’s maintenance strategy is forcing organizations into a difficult choice: invest in expensive upgrades or accept diminishing support with increasing maintenance fees. As noted in SAP’s own community, “extended maintenance has additional charges and customer-specific maintenance has limited support.” But there’s a third option that many companies are now pursuing, with remarkable results.

Why Traditional SAP Governance Is Breaking Down

Before exploring alternatives, let’s understand why the traditional approach is failing:

The Siloed Security Problem: SAP GRC excels at governing SAP applications but leaves your non-SAP applications in governance darkness. In today’s hybrid environments where employees access dozens of systems, this creates dangerous blind spots.

The Spreadsheet Nightmare: When systems can’t be managed through SAP GRC, teams resort to manual, spreadsheet-based workflows. A SailPoint study of over 300 security and IT professionals found this approach creates significant compliance gaps while overburdening already-strained teams.

The Automation Gap: Limited automation increases human error and compliance risks. When managers face reviewing thousands of access items each quarter, “approve all” becomes the dangerous norm.

And that’s just the beginning of the challenges. The real question is: what can be done about it?

Enter SailPoint: A Complete Replacement Strategy

Rather than simply integrating with SAP GRC, forward-thinking organizations are completely replacing their aging GRC implementations with SailPoint Identity Security Cloud (ISC). This approach delivers unified governance across all applications while eliminating the costs of maintaining end-of-life software.

But how does this work in practice? Let’s look at what makes this replacement strategy effective:

Unified Governance Across Everything: Unlike SAP GRC, which focuses primarily on SAP applications, SailPoint provides centralized control over user access across your entire application landscape, SAP S/4HANA, Salesforce, Active Directory, and hundreds of other systems, all from one platform. SailPoint’s connectivity solutions are specifically designed to manage and secure access to both SAP and non-SAP applications.

Native Risk Analysis: SailPoint includes a robust risk engine capable of performing Segregation of Duties checks across both SAP and non-SAP systems. This eliminates the need to retain SAP GRC for risk management while expanding risk visibility across the enterprise. According to SailPoint documentation, their comprehensive risk analysis capabilities address IT governance controls around logical access and SoD conflicts.

Infograhic

Automation That Actually Works: By automating critical processes like user provisioning, access reviews, and real-time SoD checks, SailPoint minimizes manual errors and closes compliance gaps. This isn’t just incremental improvement, it’s transformational.

Let’s see what this looks like in real-world scenarios.

Success Stories: Breaking Free from SAP GRC

Organizations replacing SAP GRC with SailPoint are seeing remarkable results:

Vodafone Turkey reduced user provisioning time from 6 hours to under 10 minutes while eliminating spreadsheet-based compliance processes. According to SailPoint’s compliance report, this delivered stronger audit capabilities and significant compliance effort reduction.

A global NYSE-listed packaging company unified governance across multiple SAP systems, standardized processes, and simplified SOX compliance, all while avoiding a costly SAP GRC upgrade. As detailed in a case study, they implemented SailPoint Identity Security Cloud with Access Risk Management as a cloud-based solution.

Aviva, a major UK insurer, implemented SailPoint across 5 countries in under 6 months, significantly lowering IT compliance costs and reducing audit overhead. According to SailPoint’s customer success documentation, this implementation centralized access certifications and SOD policy enforcement that previously required manual, siloed processes.

These results aren’t just impressive, they’re indicative of a fundamental shift in how organizations approach governance. But the question remains: how can your organization make this transition successfully?

The Migration Path: From SAP GRC to SailPoint

The journey from SAP GRC to complete SailPoint replacement involves several key phases, which we’ll explore in more detail:

  1. Assessment and Planning
    Start by inventorying your GRC rules, SoD matrices, and role catalogs. Document your current segregation of duties definitions and map GRC functions to SailPoint features. This foundation ensures nothing gets lost in translation.
  2. Implementation Approach
    Deploy SailPoint ISC as your centralized identity governance platform, connecting directly to SAP systems using official connectors. Migrate your SAP GRC risk rules to SailPoint’s native risk analysis engine and implement access request workflows that embed SoD checking.
  3. Governance Transition
    Set up access certification campaigns in SailPoint to replace SAP GRC reviews, enable continuous compliance monitoring, and implement automated provisioning with built-in SoD controls. Once SailPoint covers all critical functions, you can decommission SAP GRC entirely.

This approach allows you to not only replace SAP GRC but to enhance your governance capabilities across the entire enterprise.

Key Capabilities That Make Replacement Possible

SailPoint offers several advanced capabilities that enable complete SAP GRC replacement:

Direct SAP Connectivity: SailPoint connects directly to SAP systems using native interfaces (RFC/BAPI or REST APIs) to provision accounts, assign roles, and read identity data without requiring GRC as middleware. SailPoint’s SAP integration helps enterprises address complex identity security challenges across cloud, on-premises, and hybrid environments.

Complete Risk Analysis: By migrating all SAP GRC risk rules to SailPoint’s Access Risk Management module, organizations gain a unified risk framework spanning both SAP and non-SAP applications. For effective Segregation of Duties, SailPoint’s best practices ensure no single individual is responsible for an entire transaction.

Automated Access Certification: SailPoint’s automated certification campaigns replace manual SAP GRC access reviews with business-friendly interfaces and closed-loop remediation workflows.

Emergency Access Management: SailPoint’s privileged access workflow replaces SAP GRC’s Firefighter functionality with more streamlined yet equally secure processes.

Each of these capabilities addresses a specific gap in traditional SAP governance, creating a more comprehensive and effective approach.

The Future of SAP Governance

As organizations continue their digital transformation journeys, siloed governance approaches become increasingly untenable. By extending SAP governance beyond SAP applications, automating manual processes, and enabling continuous compliance monitoring, SailPoint creates a governance framework that scales with your business, adapts to changing regulations, and supports rather than impedes transformation.

For organizations currently utilizing SAP GRC 10.x, SailPoint ISC offers a compelling alternative to costly upgrades. Instead of investing in maintaining end-of-life software, you can deploy a solution that delivers superior governance capabilities across your entire organization.

The question is no longer whether to modernize your SAP governance approach, but how quickly you can make the transition to a more unified, automated, and effective solution.

Is your organization ready to break free from the limitations of SAP GRC? The path to modern governance may be more accessible than you think.